12 Miscellanea
Tools like sort, head and tail, grep, awk, and sed represent a powerful toolbox, particularly when used with the standard input and standard output streams. There are many other useful command line utilities, and we’ll cover a few more, but we needn’t spend quite as much time with them as we have for awk and sed.
Manipulating Line Breaks
All of the features of the tools we’ve covered so far assume the line as the basic unit of processing; awk processes columns within each line, sed matches and replaces patterns in each line (but not easily across lines), and so on. Unfortunately, sometimes the way data break over lines isn’t convenient for these tools. The tool tr translates sets of characters in its input to another set of characters as specified: ... | tr '<set1>' '<set2>'[1]
As a brief example, tr 'TA' 'AT' pz_cDNAs.fasta would translate all T characters into A characters, and vice versa (this goes for every T and A in the file, including those in header lines, so this tool wouldn’t be too useful for manipulating FASTA files). In a way, tr is like a simple sed. The major benefit is that, unlike sed, tr does not break its input into a sequence of lines that are operated on individually, but the entire input is treated as a single stream. Thus tr can replace the special “newline” characters that encode the end of each line with some other character.
On the command line, such newline characters may be represented as \n, so a file with the following three lines

could alternatively be represented as line 1\nline 2\nline 3\n (most files end with a final newline character). Supposing this file was called lines.txt, we could replace all of the \n newlines with # characters.

Notice in the above that even the final newline has been replaced, and our command prompt printed on the same line as the output. Similarly, tr (and sed) can replace characters with newlines, so tr '#' '\n' would undo the above.
Using tr in combination with other utilities can be helpful, particularly for formats like FASTA, where a single “record” is split across multiple lines. Suppose we want to extract all sequences from pz_cDNAs.fasta with nReads greater than 5. The strategy would be something like:
- Identify a character not present in the file, perhaps an
@or tab character\t(and check withgrepto ensure it is not present before proceeding). - Use
trto replace all newlines with that character, for example,tr '\n' '@'. - Because
>characters are used to indicate the start of each record in FASTA files, usesedto replace record start>characters with newlines followed by those characters:sed -r 's/>/\n>/g'.At this point, the stream would look like so, where each line represents a single sequence record (with extraneous
@characters inserted):
- Use
grep,sed,awk, and so on to select or modify just those lines of interest. (If needed, we could also usesedto remove the inserted@characters so that we can process on the sequence itself.) For our example, usesed -r 's/=/ /1' | awk '{if($3 > 5) {print $0}}'to print only lines where the nReads is greater than 5. - Reformat the file back to FASTA by replacing the
@characters for newlines, withtrorsed. - The resulting stream will have extra blank lines as a result of the extra newlines inserted before each
>character. These can be removed in a variety of ways, includingawk '{if(NF > 0) print $0}'.
Joining Files on a Common Column (and Related Row/Column Tasks)
Often, the information we want to work with is stored in separate files that share a common column. Consider the result of using blastx to identify top HSPs against the yeast open reading frame set, for example.

The resulting file pz_blastx_yeast_top1.txt contains the standard BLAST information:

Similarly, we can save a table of sequence information from the fasta_stats program with the comment lines removed as pz_stats.table.

Viewing the file with less -S:

Given such data, we might wish to ask which sequences had a hit to a yeast open reading frame and a GC content of over 50%. We could easily find out with awk, but first we need to invoke join, which merges two row/column text files based on lines with similar values in a specified “key” column. By default, join only outputs rows where data are present in both files. Both input files are required to be similarly sorted (either ascending or descending) on the key columns: join -1 <key column in file1> -2 <key column in file2> <file1> <file2>.
Like most tools, join outputs its result to standard output, which can be redirected to a file or other tools like less and awk. Ideally, we’d like to say join -1 1 -2 1 pz_stats.txt pz_blastx_yeast_top1.txt to indicate that we wish to join these files by their common first column, but as of yet the files are not similarly sorted. So, we’ll first create sorted versions.

Now we can run our join -1 1 -2 1 pz_stats.sorted.txt pz_blastx_yeast_top1.sorted.txt, piping the result into less. The output contains all of the columns for the first file, followed by all of the columns of the second file (without the key column), separated by single spaces.

Instead of viewing the output with less, piping it into an awk '{if($1 > 0.5) print $1}' would quickly identify those sequences with BLAST matches and GC content over 50%.
One difficulty with the above output is that it is quite hard to read, at least for us humans. The same complaint could be made for most files that are separated by tab characters; because of the way tabs are formatted in less and similar tools, different-length entries can cause columns to be misaligned (only visually, of course). The column utility helps in some cases. It reformats whitespace-separated row/column input so that the output is human readable, by replacing one or more spaces and tabs by an appropriate number of spaces so that columns are visually aligned: column -t <file> or ... | column -t.
By now, it should be no surprise that column writes its output to standard output. Here’s the result of join -1 1 -2 1 pz_stats.sorted.txt pz_blastx_yeast_top1.sorted.txt | column -t | less -S, which contains the same data as above, but with spaces used to pad out the columns appropriately.

Because most tools like awk and sort use any number of whitespace characters as column delimiters, they can also be used on data post-column.
There are several important caveats when using join. First, if any entries in the key columns are repeated, the output will contain a row for each matching pair of keys.
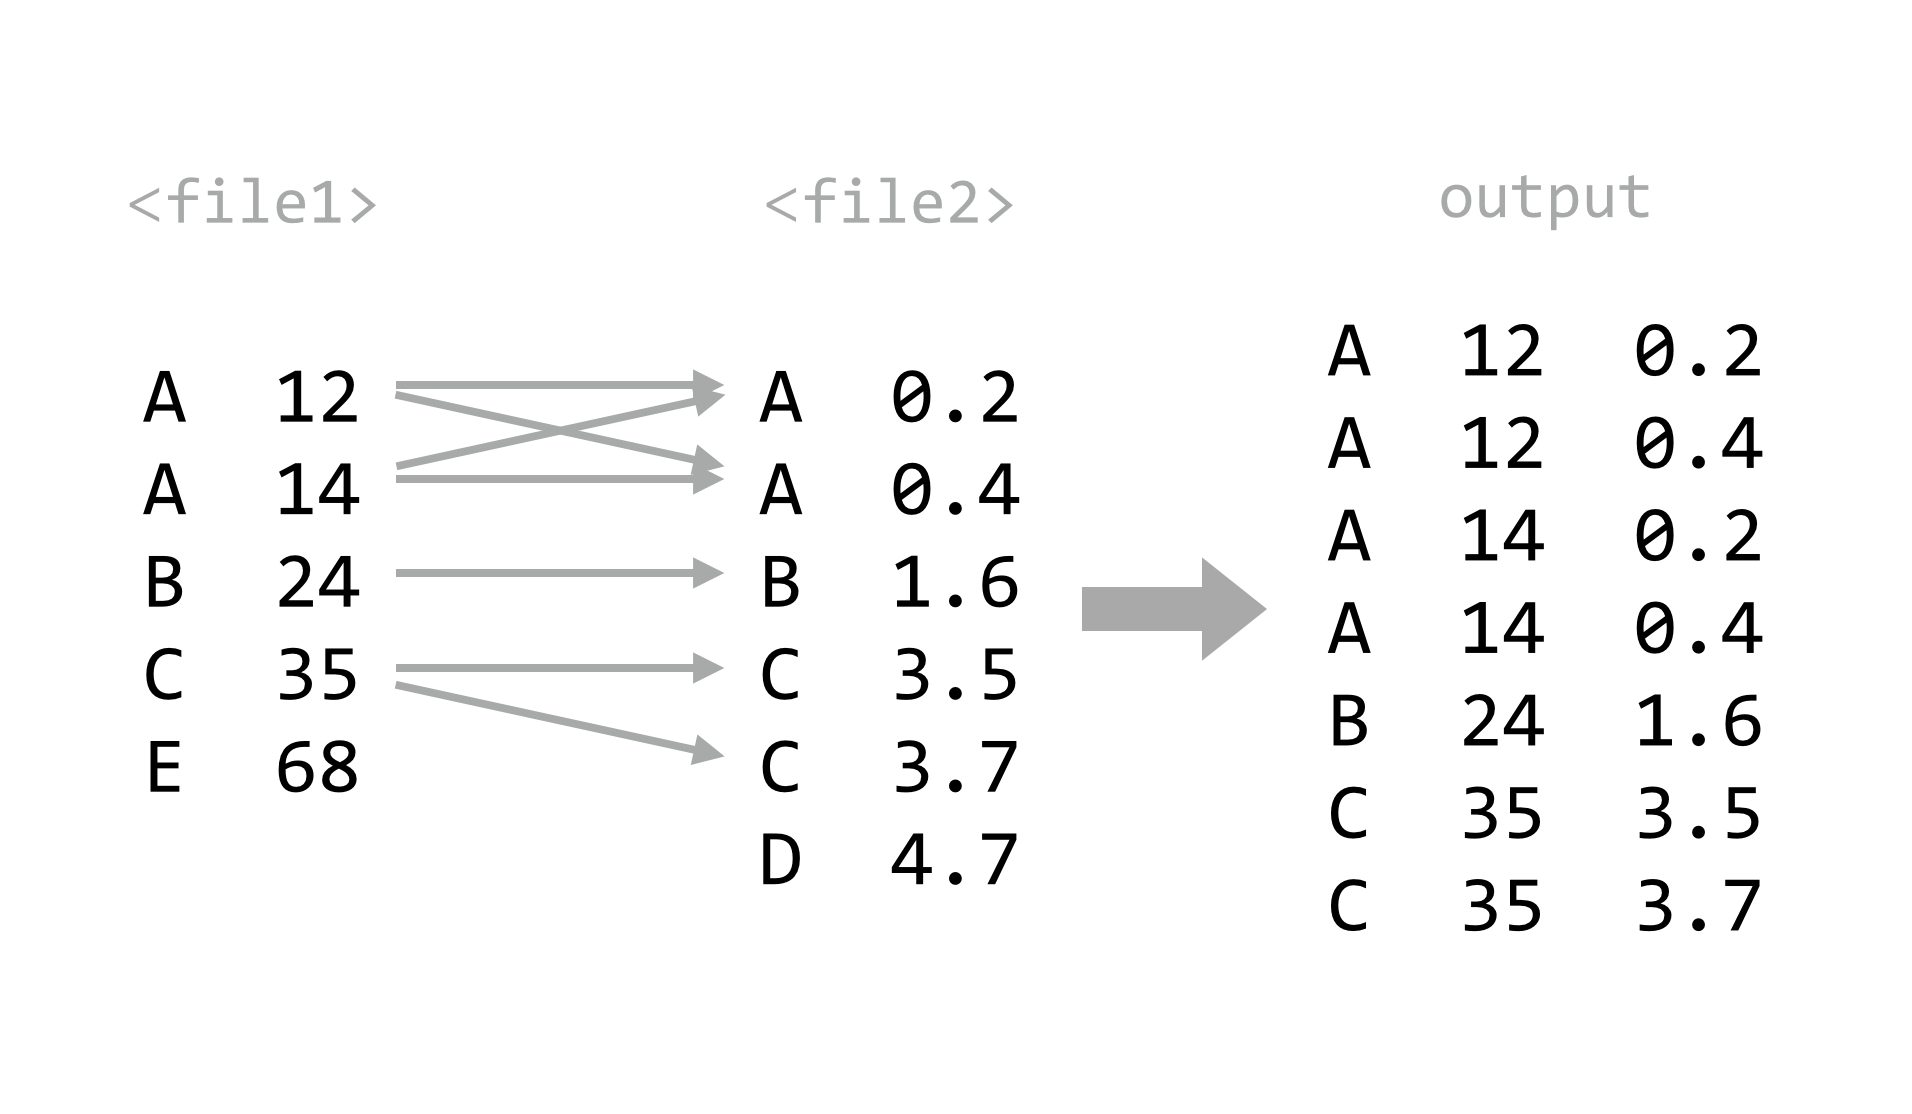
Second, the files must be similarly sorted—if they are not, join will at best produce a difficult-to-see warning. A useful trick when using bash-compatible shells is to make use of the features for “process substitution.” Basically, any command that prints to standard output may be wrapped in <( and ) and used in place of a file name—the shell will automatically create a temporary file with the contents of the command’s standard output, and replace the construct with the temporary file name. This example joins the two files as above, without separate sorting steps: join -1 1 -2 1 <(sort -k1,1d pz_stats.txt) <(sort -k1,1d pz_blastx_yeast_top1.txt). Because the pz_stats.txt file was the result of redirecting standard output from ./fasta_stats pz_cDNAs.txt through grep -v '#', we could equivalently say join -1 1 -2 1 <(./fasta_stats pz_cDNAs.fasta | grep -v '#' | sort -k1,1d) <(sort -k1,1d pz_blastx_yeast_top1.txt).
Finally, unless we are willing to supply an inordinate number of arguments, the default for join is to produce only lines where the key information is found in both files. More often, we might wish for all keys to be included, with “missing” values (e.g., NA) assumed for data present in only one file. In database parlance, these operations are known as an “inner join” and “full outer join” (or simply “outer join”), respectively.

Where join does not easily produce outer joins, more sophisticated tools can do this and much more. For example, the Python and R programming languages (covered in later chapters) excel at manipulating and merging collections of tabular data. Other tools utilize a specialized language for database manipulation known as Structured Query Language, or SQL. Such databases are often stored in a binary format, and these are queried with software like MySQL and Postgres (both require administrator access to manage), or simpler engines like sqlite3 (which can be installed and managed by normal users).[2]
Counting Duplicate Lines
We saw that sort with the -u flag can be used to remove duplicates (defined by the key columns used). What about isolating duplicates, or otherwise counting or identifying them? Sadly, sort isn’t up to the task, but a tool called uniq can help. It collapses consecutive, identical lines. If the -c flag is used, it prepends each line with the number of lines collapsed: uniq <file> or ... | uniq.
Because uniq considers entire lines in its comparisons, it is somewhat more rigid than sort -u; there is no way to specify that only certain columns should be used in the comparison.[3] The uniq utility will also only collapse identical lines if they are consecutive, meaning the input should already be sorted (unless the goal really is to merge only already-consecutive duplicate lines). Thus, to identify duplicates, the strategy is usually:
- Extract columns of interest using
awk. - Sort the result using
sort. - Use
uniq -cto count duplicates in the resulting lines.
Let’s again consider the output of ./fasta_stats pz_cDNAs.fasta, where column 4 lists the most common 5-mer for each sequence. Using this extract/sort/uniq pattern, we can quickly identify how many times each 5-mer was listed.

The result lists the counts for each 5-mer. We could continue by sorting the output by the new first column to identify the 5-mers with the largest counts.

It is often useful to run uniq -c on lists of counts produced by uniq -c. Running the result above through awk '{print $1}' | sort -k1,1n | uniq -c reveals that 90 5-mers are listed once, 18 are listed twice, and so on.

Counting items with uniq -c is a powerful technique for “sanity checking” data. If we wish to check that a given column or combination of columns has no duplicated entries, for example, we could apply the extract/sort/uniq strategy followed by awk '{if($1 > 1) print $0}'. Similarly, if we want to ensure that all rows of a table have the same number of columns, we could run the data through awk '{print NF}' to print the number of columns in each row and then apply extract/sort/uniq, expecting all column counts to be collapsed into a single entry.
Basic Plotting with gnuplot
Further illustrating the power of awk, sed, sort, and uniq, we can create a text-based “histogram” of coverages for the sequences in the pz_cDNAs.fasta file, which are stored in the third column of the header lines (e.g., >PZ7180000000004_TX nReads=26 cov=9.436). We’ll start by isolating the coverage numbers with grep (to select only header lines), sed (to replace = characters with spaces), and awk (to extract the new column of coverage numbers), while simultaneously printing only the integer portion of the coverage column.

The output is a simple column of integers, representing rounded-down coverages. Next, a sort -k1,1n | uniq -c will produce the counts for each coverage bin, revealing that most sequences (281) are at 1X coverage, a handful are at 2X and 3X, and higher coverages are increasingly rare.

Although languages like Python and R provide user-friendly data-plotting packages, it can sometimes be helpful to quickly plot a data set on the command line. The gnuplot program can produce not only image formats like PNG and PDF, but also text-based output directly to standard output. Here’s the command to plot the above histogram (but with points, rather than the traditional boxes), along with the output.
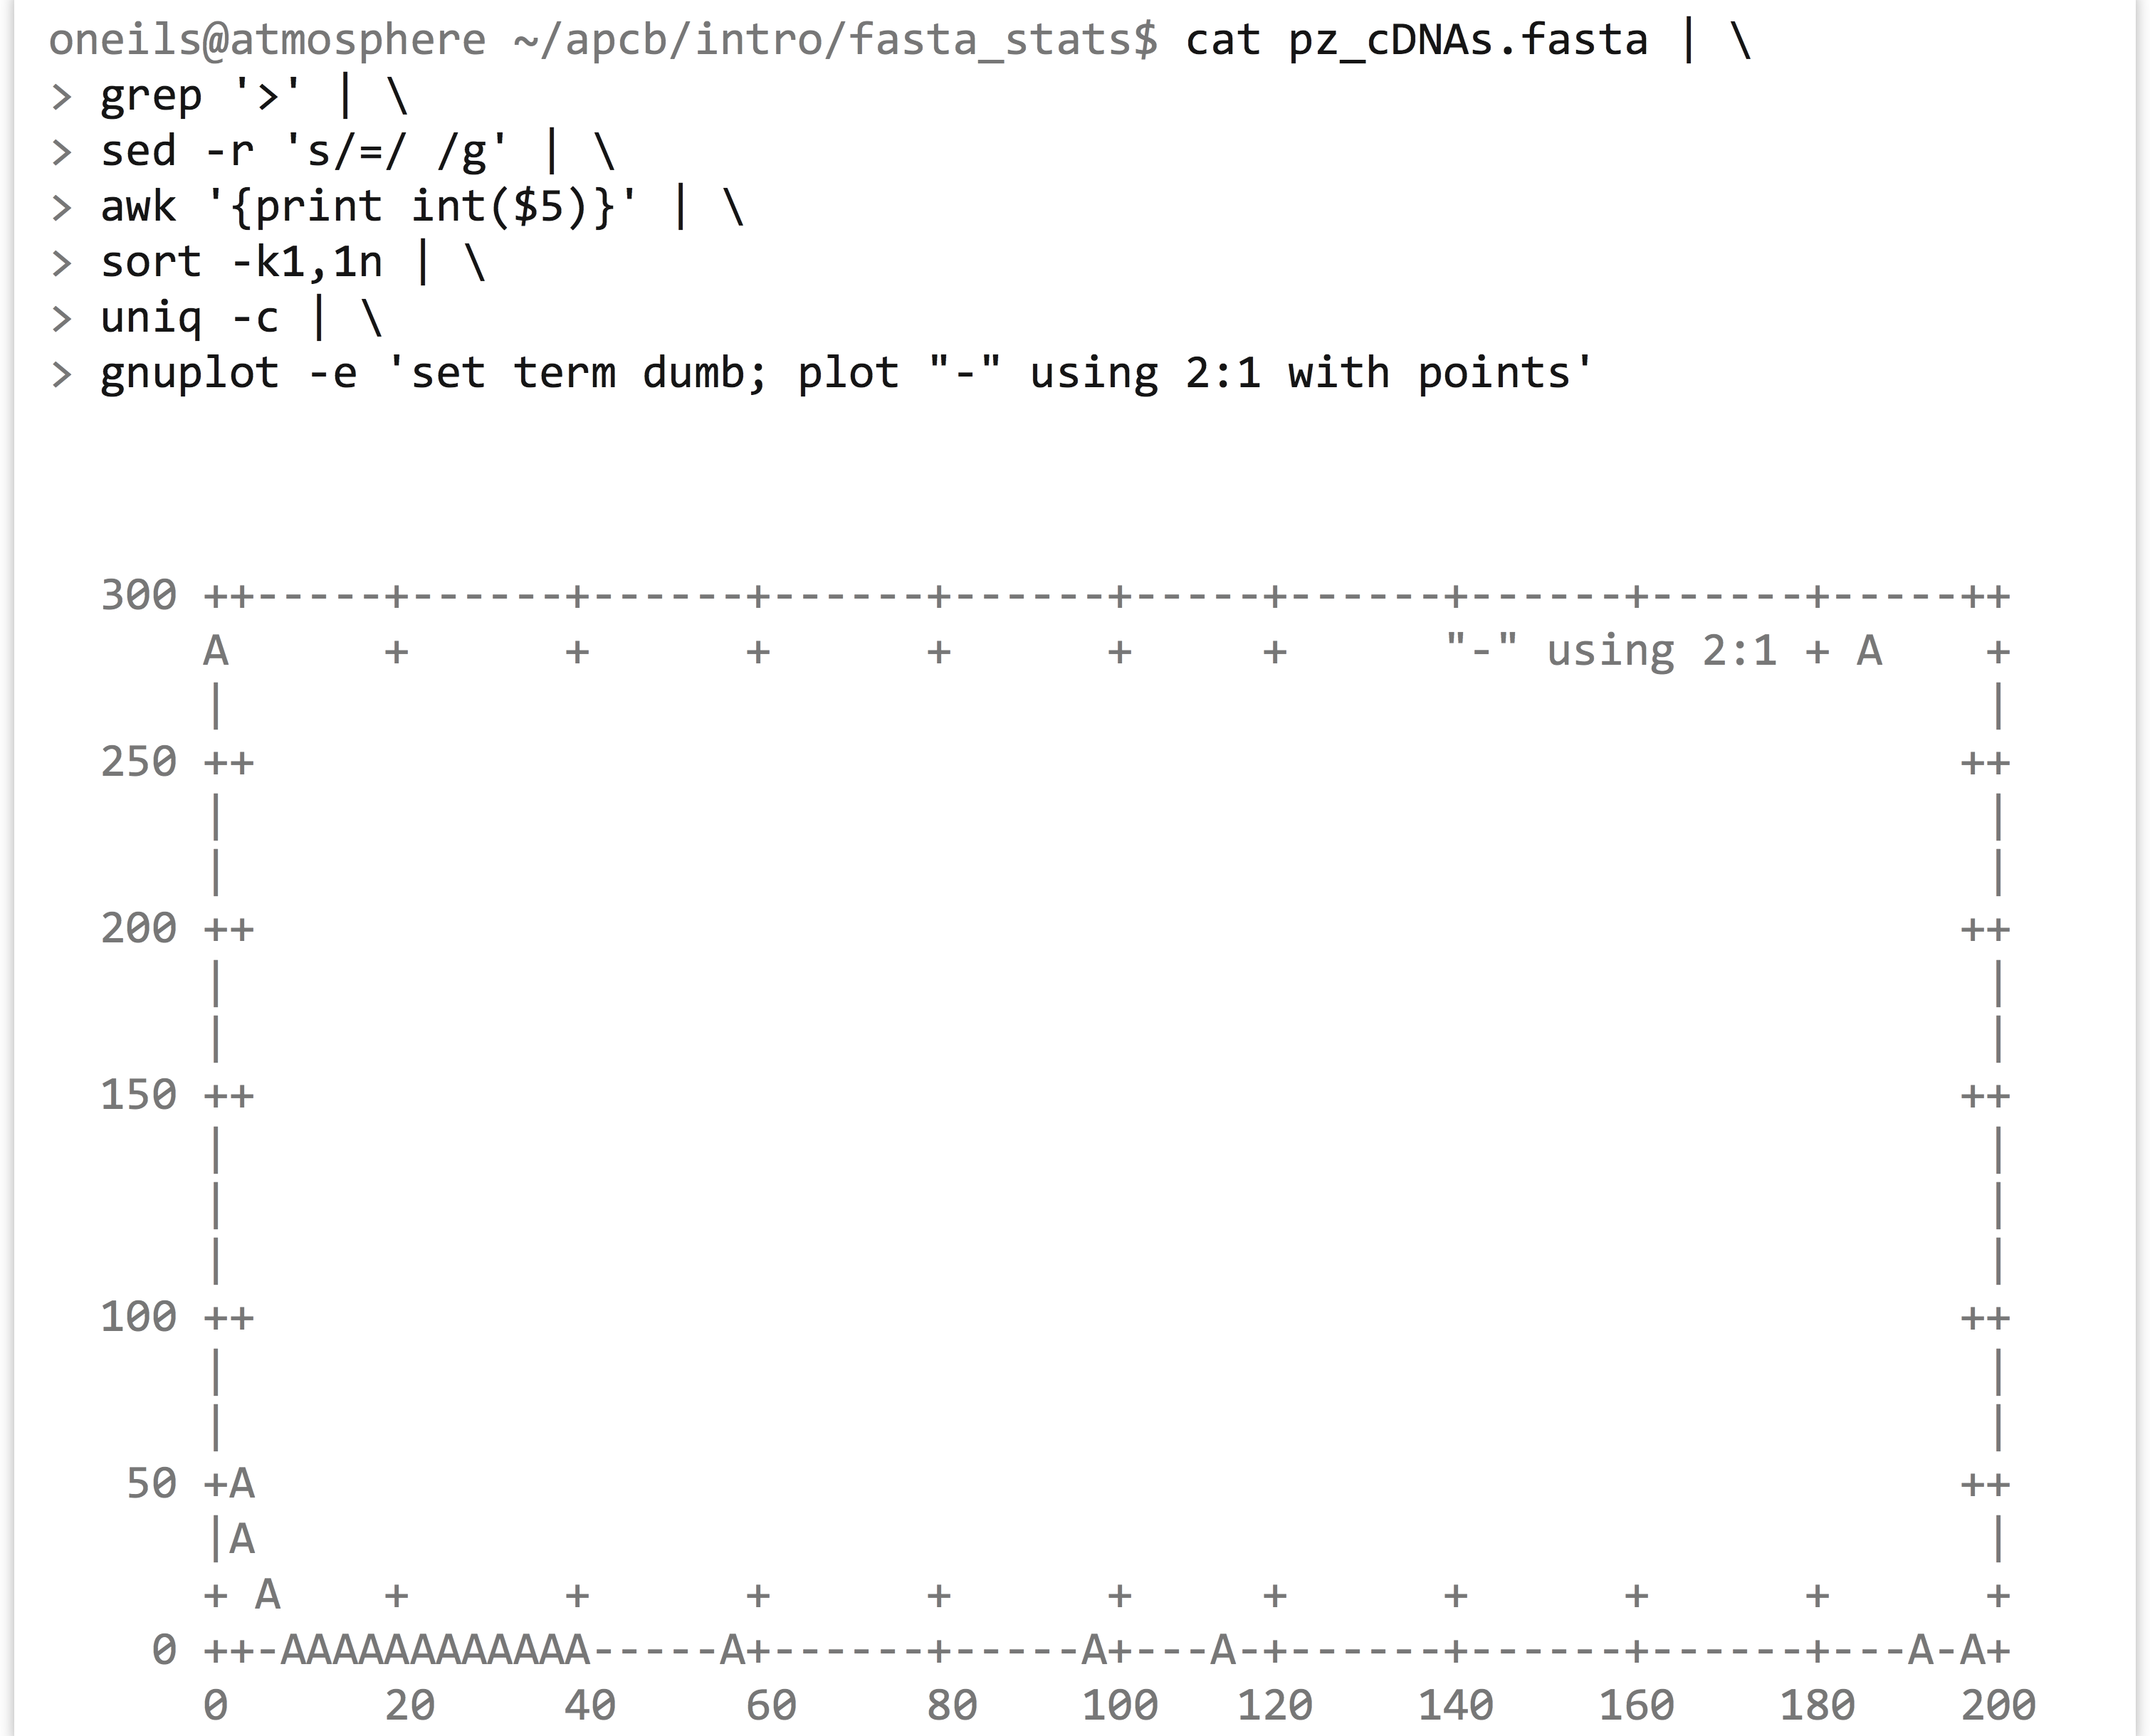
It’s a bit difficult to see, but the plotted points are represented by A characters. Breaking down the gnuplot command, set term dumb instructs gnuplot to produce text-based output, plot "-" indicates that we want to plot data from the standard input stream, using 2:1 indicates that X values should be drawn from the second column and Y values from the first, and with points specifies that points—as opposed to lines or boxes—should be drawn. Because the counts of coverages drop off so rapidly, we may want to produce a log/log plot, and we can add a title, too: gnuplot -e 'set term dumb; set logscale xy; plot "-" using 2:1 with points' title "Coverage Counts"
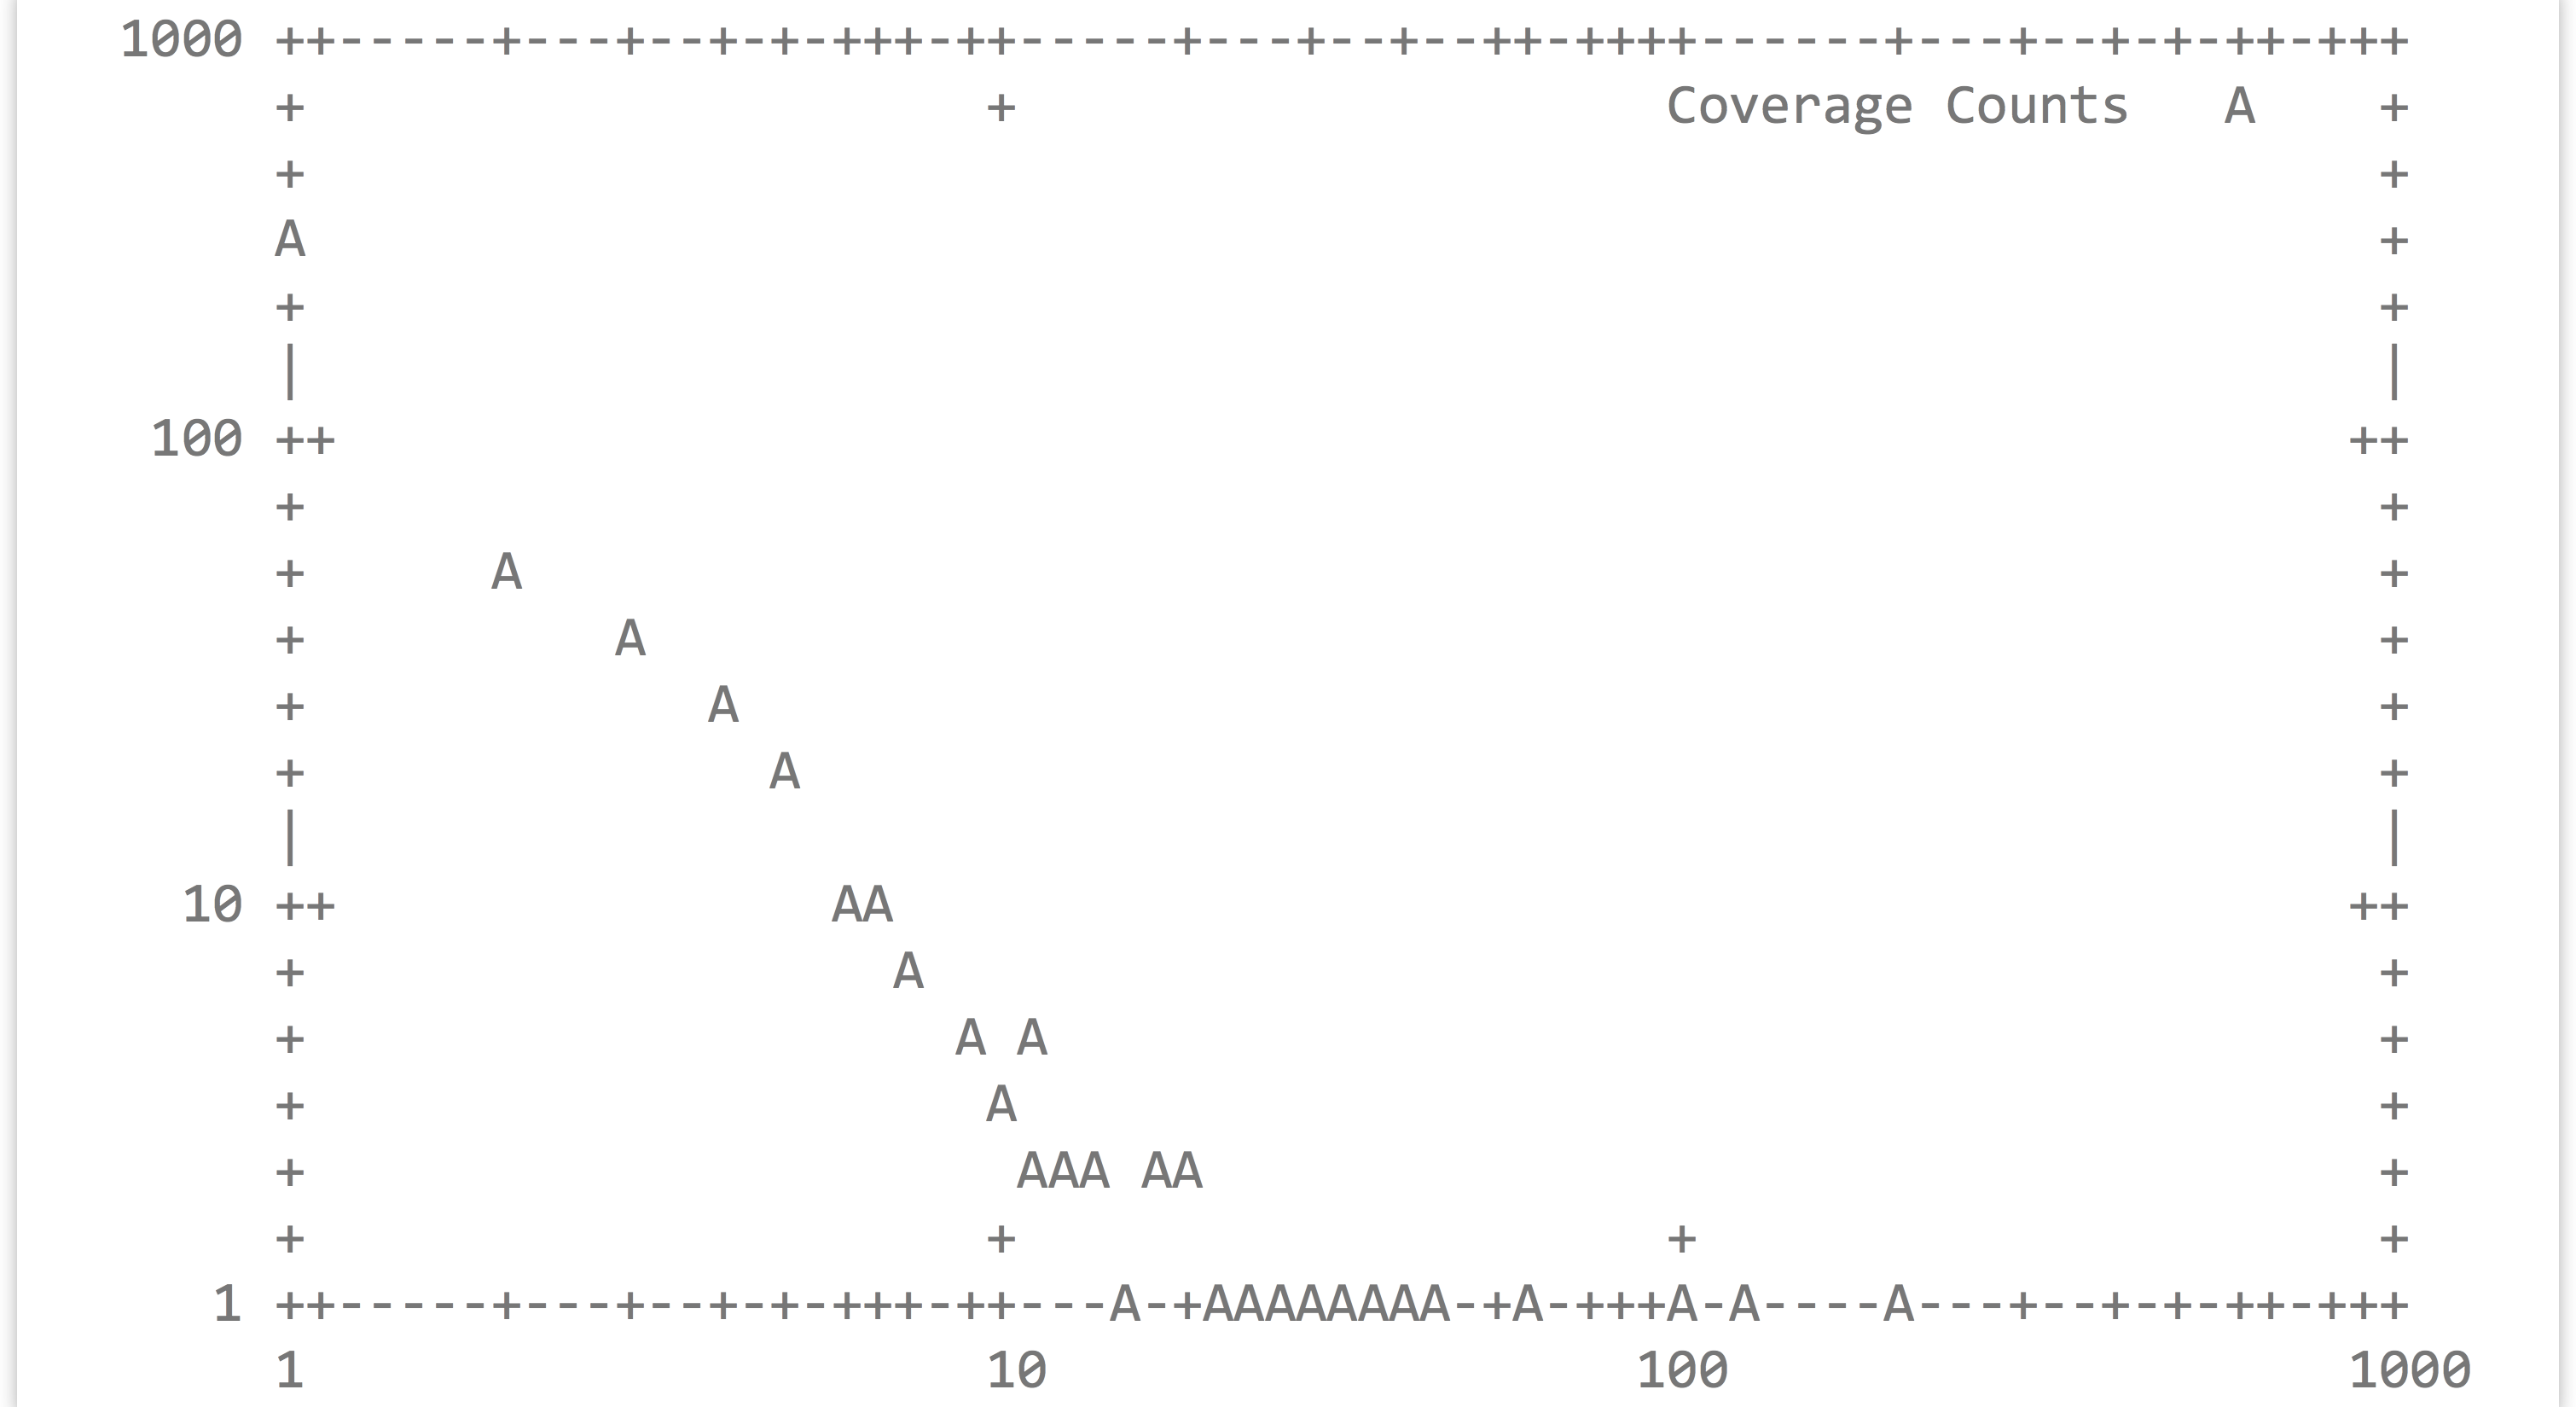
Although we’ve only shown the most basic usage of gnuplot, it is actually a sophisticated plotting package—the various commands are typically not specified on the command line but are rather placed in an executable script. For a demonstration of its capabilities, visit http://gnuplot.info.
For-Loops in bash
Sometimes we want to run the same command or similar commands as a set. For example, we may have a directory full of files ending in .tmp, but we wished they ended in .txt.

Because of the way command line wildcards work, we can’t use a command like mv *.tmp *.txt; the *.tmp would expand into a list of all the files, and *.txt would expand into nothing (as it matches no existing file names).
Fortunately, bash provides a looping construct, where elements reported by commands (like ls *.tmp) are associated with a variable (like $i), and other commands (like mv $i $i.txt) are executed for each element.

It’s more common to see such loops in executable scripts, with the control structure broken over several lines.

This solution works, though often looping and similar programming techniques (like if-statements) in bash become cumbersome, and using a more robust language like Python may be the better choice. Nevertheless, bash does have one more interesting trick up its sleeve: the bash shell can read data on standard input, and when doing so attempts to execute each line. So, rather than using an explicit for-loop, we can use tools like awk and sed to “build” commands as lines. Let’s remove the .tmp from the middle of the files by building mv commands on the basis of a starting input of ls -1 *.tmp* (which lists all the files matching *.tmp* in a single column). First, we’ll build the structure of the commands.

To this we will add a sed -r s/\.tmp//2 to replace the second instance of .tmp with nothing (remembering to escape the period in the regular expression), resulting in lines like

After the sed, we’ll pipe this list of commands to bash, and our goal is accomplished.

Version Control with git
In chapter 6, “Installing (Bioinformatics) Software,” we worked on a rather sophisticated project, involving installing software (in our $HOME/local/bin directory) as well as downloading data files and writing executable scripts (which we did in our $HOME/projects/p450s directory). In particular, we initially created a script to automate running HMMER on some data files, called runhmmer.sh. Here are the contents of the project directory when last we saw it:

It may be that as we continue working on the project, we will make adjustments to the runhmmer.sh script or other text files in this directory. Ideally, we would be able to access previous versions of these files—in case we need to refer back for provenance reasons or we want to undo later edits. One way to accomplish this task would be to frequently create backup copies of important files, perhaps with file names including the date of the backup. This would quickly become unwieldy, however.
An alternative is to use version control, which is a system for managing changes to files (especially programs and scripts) over time and across various contributors to a project. A version control system thus allows a user to log changes to files over time, and it even allows multiple users to log changes, providing the ability to examine differences between the various edits. There are a number of popular version control programs, like svn (subversion) and cvs (concurrent versioning system). Because the job of tracking changes in files across time and users is quite complex (especially when multiple users may be simultaneously making independent edits), using version control software can be a large skill set in itself.
One of the more recently developed version control systems is git, which has gained popularity for a number of reasons, including its use in managing popular software projects like the Linux kernel.[4]The git system (which is managed by a program called git) uses a number of vocabulary words we should define first.
- Repository
- Also known as a “repo,” a
gitrepository is usually just a folder/directory.
- Also known as a “repo,” a
- Version
- A version is effectively a snapshot of a selected set of files or directories in a repository. Thus there may be multiple versions of a repository across time (or even independently created by different users).
- Commit
- Committing is the action of storing a set of files (in a repository) to a version.
- Diff
- Two different versions may be “diffed,” which means to reveal the changes between them.
- Stage
- Not all files need to be included in a version; staging a set of files marks them for inclusion in the version when the next commit happens.
The git system, like all version control systems, is fairly complex and provides many features. The basics, though, are: (1) there is a folder containing the project of interest; (2) changes to some files are made over time; (3) edited files can periodically be “staged”; and (4) a “commit” includes a snapshot of all staged files and stores the information in a “version.” (For the record, all of this information is stored in a hidden directory created within the project directory called .git, which is managed by the git program itself.)
To illustrate, let’s create a repository for the p450s project, edit the runhmmer.sh script file as well as create a README.txt file, and commit those changes. First, to turn a directory into a git repository, we need to run git init:

This step creates the hidden directory .git containing the required files for tracking by the system. We don’t usually need to work directly with this directory—the git software will do that for us. Next, we will create our first version by staging our first files, and running our first commit. We could keep tracked versions of all the files in this directory, but do we want to? The data files like dmel-all-translation-r6.02.fasta are large and unlikely to change, so logging them would be unnecessary. Similarly, because the output file p450s_hmmsearch_dmel.txt is generated programmatically and can always be regenerated (if we have a version of the program that created it), we won’t track that, either. To “stage” files for the next commit, we use git add; to stage all files in the project directory, we would use git add -A, but here we want to stage only runhmmer.sh, so we’ll run git add runhmmer.sh.

No message has been printed, but at any time we can see the status of the git process by running git status.
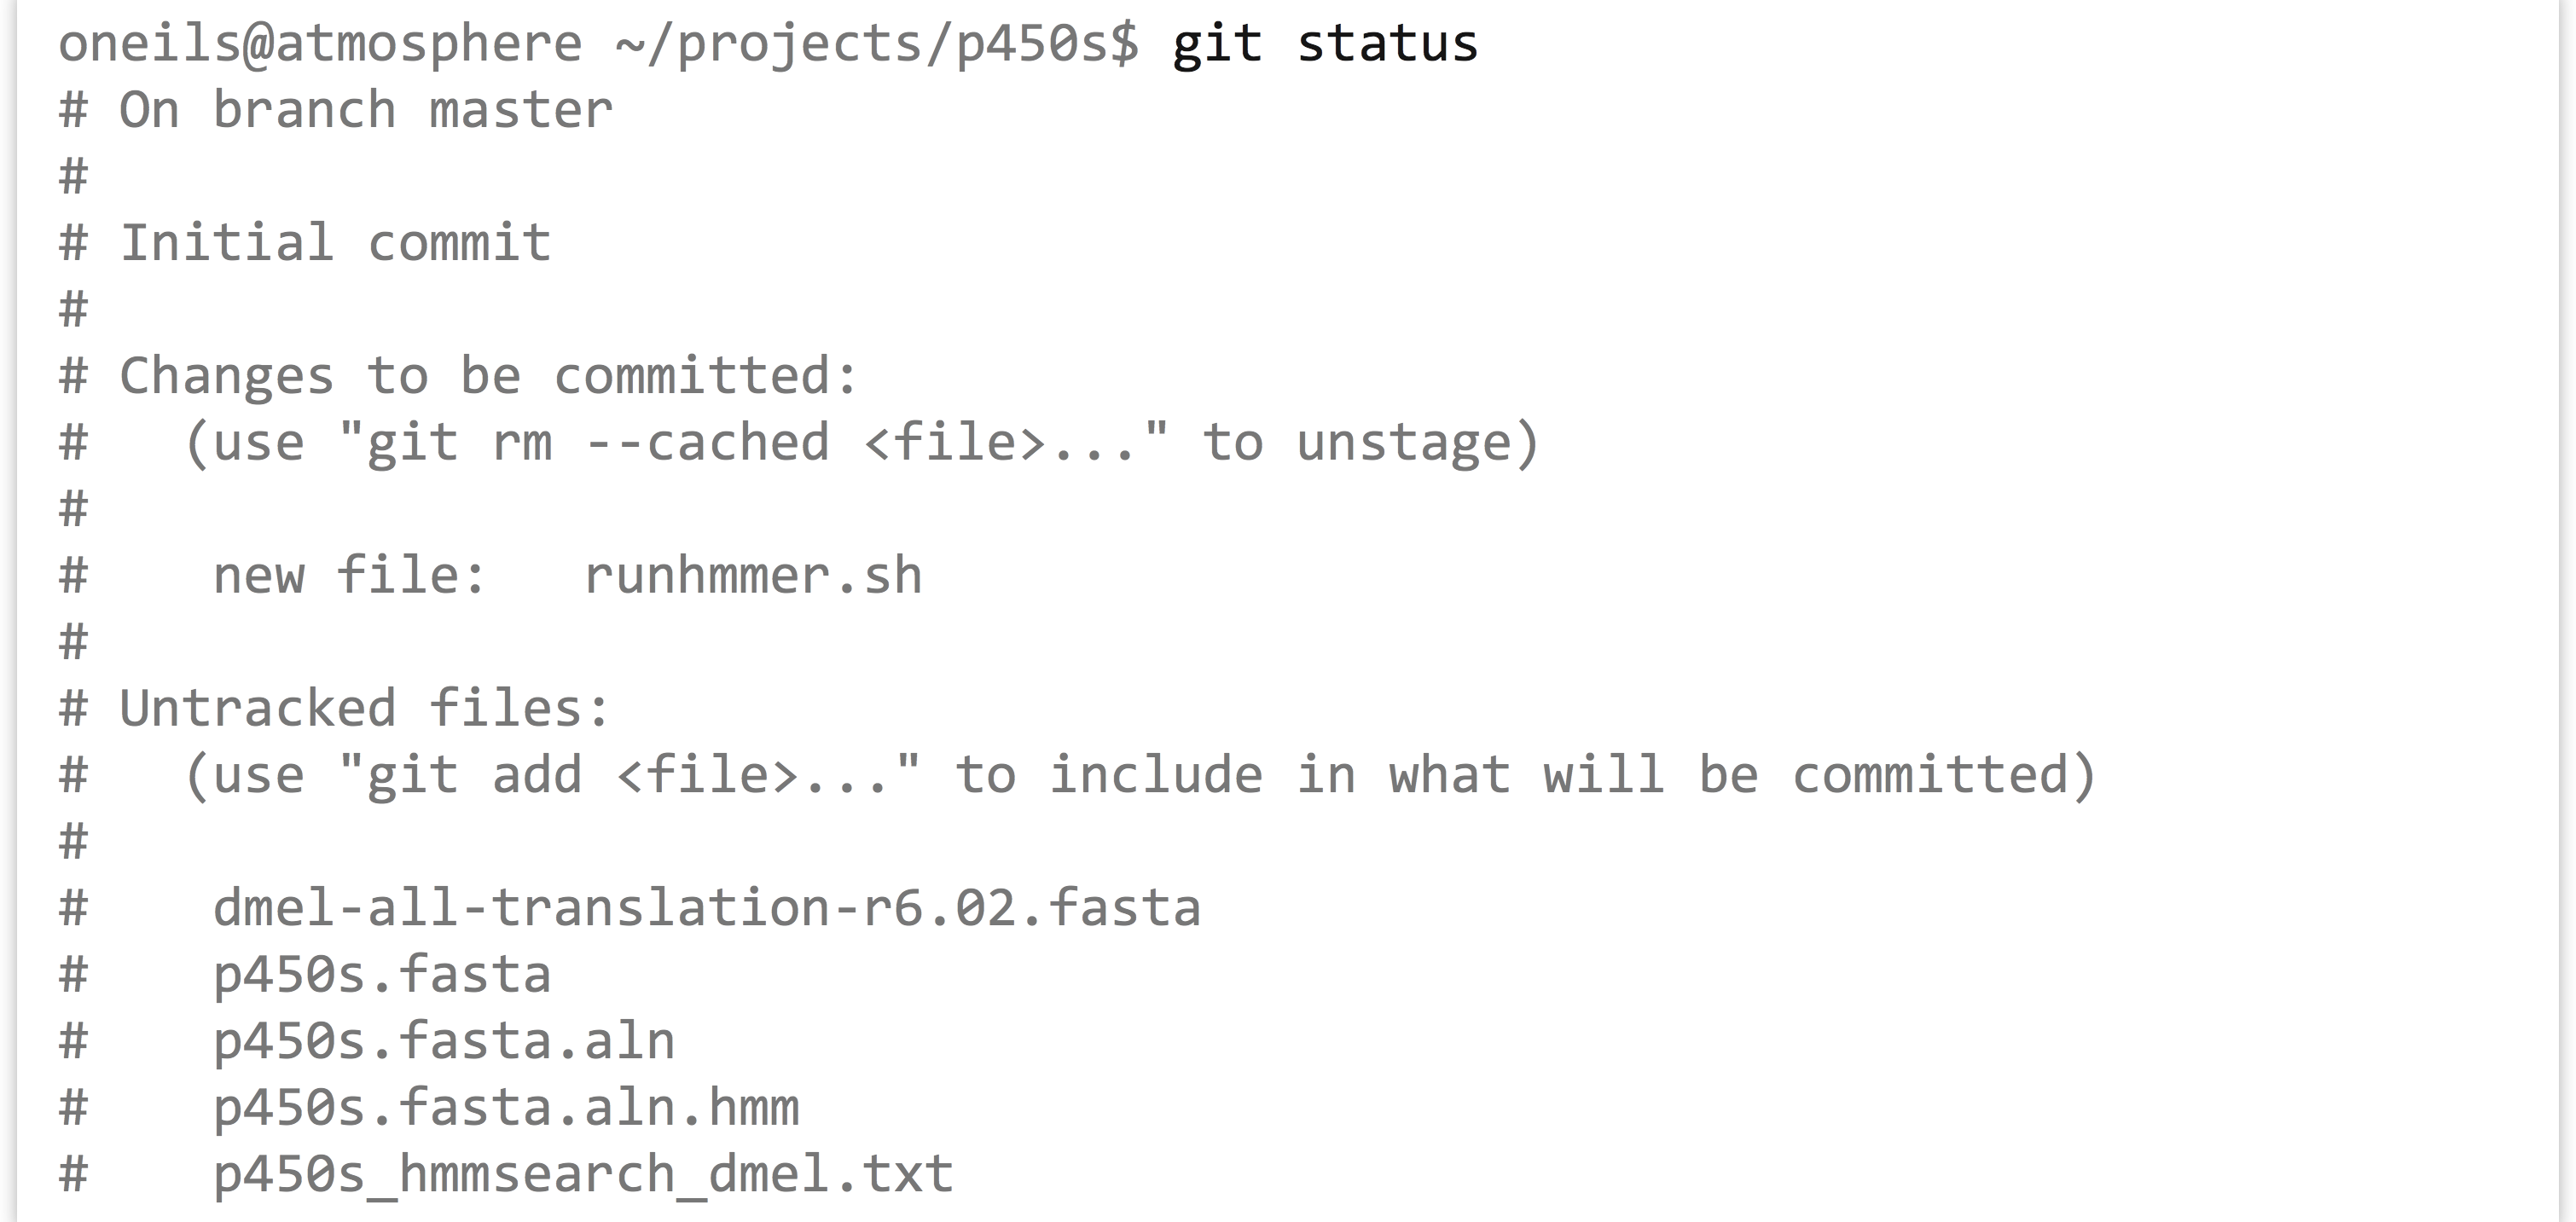
The status information shows that we have one new file to track, runhmmer.sh, and a number of untracked files (which we’ve left untracked for a reason). Now we can “commit” these staged files to a new version, which causes the updated staged files to be stored for later reference. When committing, we need to enter a commit message, which gives us a chance to summarize the changes that are being committed.

At this point, a git status would merely inform us that we still have untracked files. Let’s suppose we make some edits to runhmmer.sh (adding a new comment line, perhaps), as well as create a new README.txt file describing the project.

Running git status at this point would report a new untracked file, README.txt, as well as a line reading modified: runhmmer.sh to indicate that this file has changed since the last commit. We could continue to edit files and work as needed; when we are ready to commit the changes, we just need to stage the appropriate files and run another commit.

Every version that we commit is saved, and we can easily see a quick log of the history of a project with git log.

Notice that each commit is given a long serial number, such as ec46950b36.... To see the differences between two commits, we can run git diff with just the few characters of each serial number, as in git diff 50c11fe ec4695. The output format isn’t remarkably readable by default.
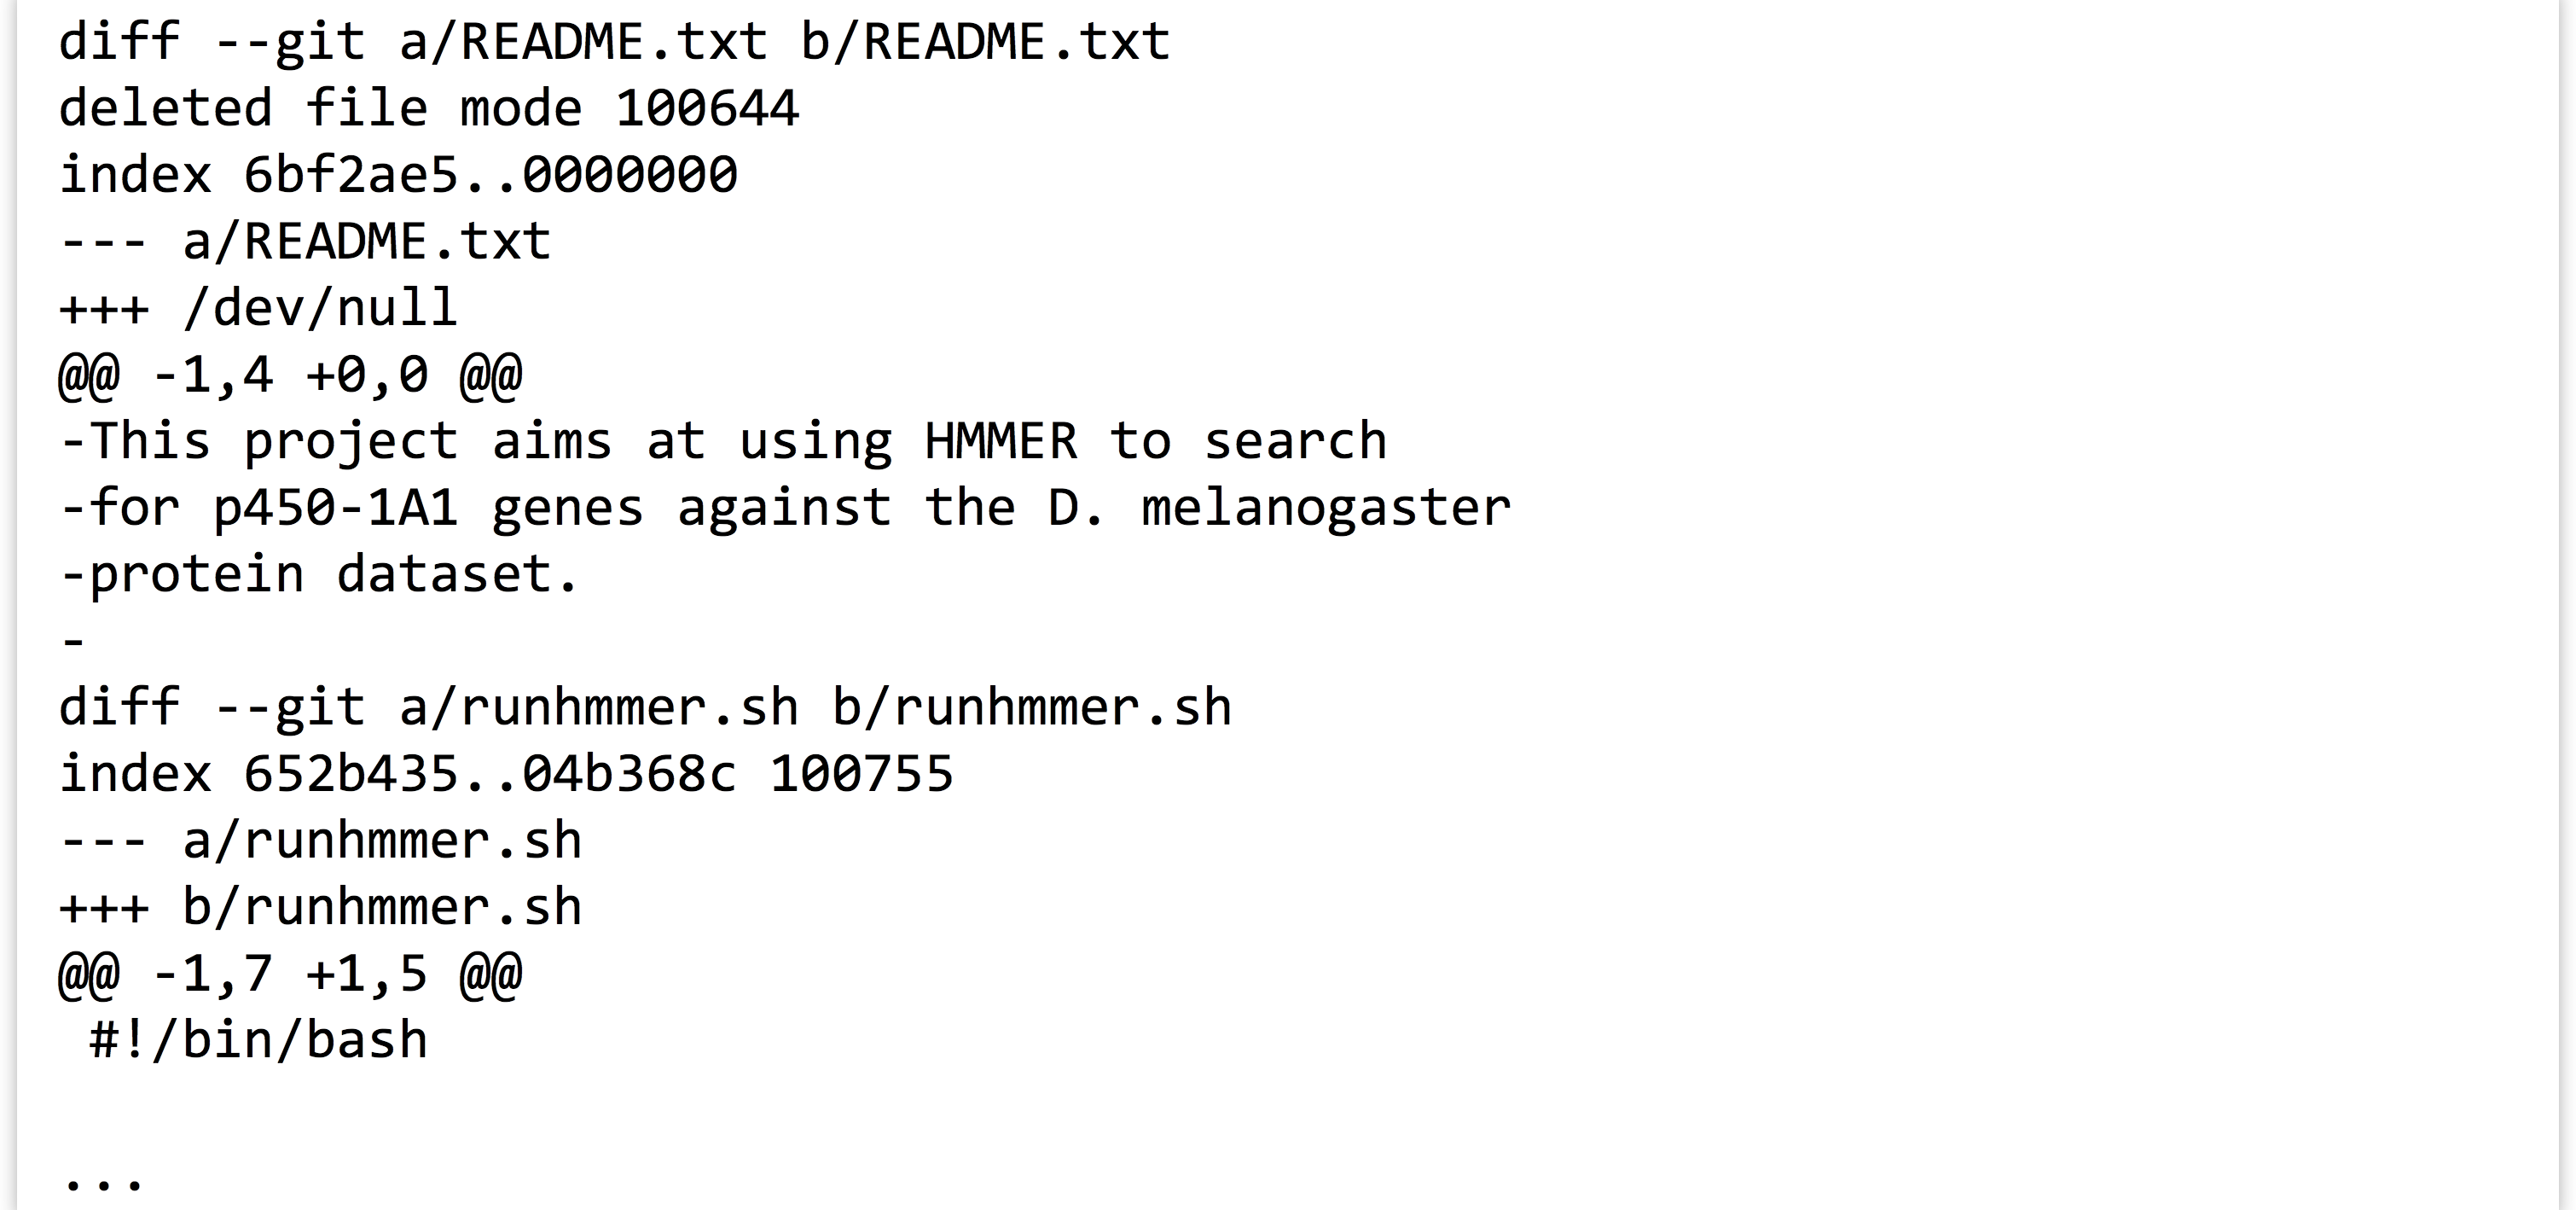
Many other operations can be performed by git, such as viewing the contents of files from previous versions and “reverting” a project to a previous state (at least for those files that are tracked).
There are two other features worth mentioning. First, it’s not uncommon to have many files that we’d like to leave untracked, but adding all of the rest one at a time with git add is tedious. Fortunately, git add -A looks at the contents of the file .gitignore (which may need to be created): any files or directories listed in .gitignore will not be staged by git add -A. (And the .gitignore file can be tracked.)
Second, the git system makes it relatively easy to share projects online with others, by creating repositories on sites like GitHub. After setting up an account at http://github.com (or on a similar site, such as http://bitbucket.com), you can “push” the current state of your project from the command line to the web. (Future commits can also be pushed as you create them.) Other users can then “clone” the project from the website by using the git clone command discussed briefly in chapter 6. GitHub and similar websites feature excellent tutorials for interfacing their products with your own command line repositories, should you desire to use them.
Exercises
- In the file
pz_cDNAs.fasta, sequence IDs are grouped according to common suffixes like_TY,_ACT, and the like. Which group has the largest number of sequences, and how many are in that group? - Using the various command line tools, extract all sequences composed of only one read (
nReads=1) frompz_cDNAs.fastato a FASTA formatted file calledpz_cDNAs_singles.fasta. - In the annotation file
PZ.annot.txt, each sequence ID may be associated with multiple gene ontology (GO) “numbers” (column 2) and a number of different “terms” (column 3). Many IDs are associated with multiple GO numbers, and there is nothing to stop a particular number or term from being associated with multiple IDs. Which GO number is associated with largest number of unique IDs? How many different IDs is it associated with? Next, answer the same questions using the GO term instead of GO number. For the latter, beware that the column separators in this file are tab characters,
 \t, butawkby default uses any whitespace, including the spaces found in the terms column. In this file, though,isocitrateis not a term, butisocitrate dehydrogenase (nad+)is.
- Unlike other tools,
trcan only read its input from stdin. ↵ - While binary databases such as those used by
sqlite3and Postgres have their place (especially when large tables need to be joined or searched), storing data in simple text files makes for easy access and manipulation. A discussion of SQL syntax and relational databases is beyond the scope of this book; see Jay Kreibich’s Using SQLite (Sebastopol, CA: O’Reilly Media, Inc., 2010) for a friendly introduction tosqlite3and its syntax. ↵ - This isn’t quite true: the
-f <n>flag foruniqremoves the first<n>fields before performing the comparison. ↵ - Linus Torvalds, who also started the Linux kernel project, developed the
gitsystem. Quoting Linus: “I’m an egotistical bastard, and I name all my projects after myself. First ‘Linux,’ now ‘Git.’” (Here “git” refers to the British slang for a “pig-headed and argumentative” person.) ↵

