11 Is Your Home Ready for an Earthquake?
“. . . severe and appalling as this great convulsion of the earth unquestionably was, it is a settled conviction with all here that not a person would have been killed or hurt had their houses all been made of wood.”
Editorial, Inyo Independent, 1872
after the Owens Valley, California, Earthquake
1. Introduction: How Safe is Safe Enough?
Chances are two out of three that you’ll be at home when the next big earthquake strikes, and one out of three that you’ll be in bed. So, your home’s ability to withstand an earthquake affects not only your pocketbook but also your life and the lives of those who live with you. If you are an owner or even a renter, you can take steps to make your home safer against an earthquake.
But first you need to make some decisions. Sure, you want to be safe, but how much are you willing to spend to protect your home and family against an earthquake that may not strike while you are living there? Is it your goal that you and those around you walk away from your house without serious injury, or that your house survives the earthquake as well? Deciding would be easier if scientists could tell you when the next earthquake will strike. But they can’t. You might spend a lot of money protecting against an earthquake that might not strike during your lifetime.
This chapter reviews the steps you can take to protect your home, your valuables, and yourself from earthquake shaking, presented in order of importance. The chapter does not consider damage to your house from liquefaction, landslides, surface rupture, subsidence, or tsunamis. It assumes that the ground on which your house is built will be shaken but not permanently deformed by the earthquake.
It is critical to keep your house from collapsing or from catching on fire, so those preventive steps are presented first. This is followed by discussion of other, less critical prevention measures. Then you can make the decision about how much protection is enough for you.
2. Some Fundamentals: Inertia, Loads, and Ductility
Imagine for a moment that your house is anchored to a flatcar on a moving train. Suddenly the train collides with another train, and the flatcar stops abruptly. What happens to your house? If it’s a wood-frame house, as most houses in the Northwest are, it probably would not collapse, although your brick chimney might topple over. If your house is made of brick or concrete block, unreinforced by steel rebar, then the entire house might collapse.
This analogy introduces an important concept. The jolt to your house during the train wreck is analogous to the shocks the house would receive during a large earthquake, except that the earthquake jolts would be more complicated and would last longer. The motion might be sharply back and forth for tens of seconds, combined with ups and downs and sideways motions. The response of the house and its contents (including you) to these jolts follows the principle of inertia.
The principle of inertia says that a stationary object will remain stationary, or an object traveling at a certain speed in a certain direction will continue traveling at that speed and in that direction, unless acted on by some outside force. Because of inertia, your body is pulled to the right when you turn your car sharply left. Inertia is the reason seat belts are necessary. If your car hits a tree and you’re not wearing a seat belt, your body’s inertia keeps you moving forward at the same rate as the car before it hit the tree, propelling you through the windshield.
Stack some blocks on a towel on a table. Then suddenly pull the towel out from under the blocks and toward you. The blocks will fall away from you, as if they were being propelled by an opposing force. This force is called an inertial force. The inertia of the blocks tends to make them stay where they are, which means that they must fall away from you when you pull the towel toward you.
I saw a graphic illustration of inertia at the Los Angeles County Olive View Medical Center, which was destroyed by the Sylmar Earthquake in February 1971. Upper stories of the hospital seemed to weather the earthquake without damage. (In fact, glasses of water on bedside tables on the top floor weren’t even spilled.) But the walls on the ground floor—which had much more open space and, therefore, was much weaker than the upper floors—were tilted in one direction. The ground beneath the hospital had moved suddenly in a horizontal direction, but the inertia of the hospital building caused it to appear to move in the opposite direction (Figure 12-10). The inertial forces were absorbed in the weaker ground floor. (For an illustration of inertial forces affecting a garage, see Figure 11-6.)
Engineers refer to the forces acting on a building as loads. The weight of the building itself is called a dead load. Other forces, such as the weight of the contents of the building—including people, snow on the roof, a wind roaring down the Columbia River gorge, or earthquakes—are called live loads. The building must be designed to support its own weight, and this is standard practice. It also must be designed to support the weight of its contents, and this is also standard practice—although occasionally the news media report the collapse of a gymnasium roof due to a load of snow and ice.
Except for high winds and earthquakes, all the loads mentioned above are vertical loads, commonly accounted for in engineering design. But the wind load is a horizontal load. In designing buildings in a location subject to gale-force winds, horizontal wind loads are indeed taken into account. Earthquake loads are both vertical and horizontal. Massive structures attract more seismic forces; wooden buildings are lighter and respond better to earthquake forces. These forces are very complex, and in contrast to wind loads (except for tornadoes) they are applied suddenly, with high acceleration.
I have already discussed acceleration as a percentage of the attraction of the Earth due to its gravity, or g. During a space shuttle launch, astronauts are subjected to accelerations of several g as they rocket into space. A downhill ride on a roller coaster temporarily counteracts the Earth’s gravity to produce zero g, and this accounts for the thrill (and sometimes queasy feeling) we experience. Acceleration during an earthquake is the Earth’s answer to a roller-coaster ride. If the shaking is enough to throw objects into the air, the acceleration is said to be greater than one g. High accelerations, particularly high horizontal accelerations, can cause a lot of damage.
The dead weight of a building and its contents can be calculated fairly accurately and can be accounted for in engineering design. These loads are called static loads; they do not change with time. Wind loads and earthquake loads change suddenly and unpredictably; these are called dynamic loads. The engineer must design a structure to withstand dynamic loads that may be highly variable over a very short period of time, a much more difficult task than designing for static loads alone. Because the awareness of the potential for earthquake loads is only a few decades old, many older buildings were not designed to stand up against the dynamic loads caused by earthquakes.
In Chapter 2, rocks of the crust were described as either brittle or ductile. Brittle crust fractures under the accumulated strain of the motion of tectonic plates and produces earthquakes. The underlying warm and pliable ductile crust deforms without earthquakes.
Structural engineers use these terms to refer to buildings. A building that is ductile is able to bend and sway during an earthquake without collapsing. In some cases, the building “bounces back” like a tree swaying in the wind, and it isn’t permanently deformed. Deformation is elastic, as described earlier for balloons and boards. In other cases, the building deforms permanently but it still doesn’t collapse, so that people inside can escape, although in the Northridge Earthquake, it turned out that the welds connecting steel frames were not ductile, and these welds failed. Wood-frame houses are also ductile. Fortunately, most of us live in wood-frame houses.
In contrast, a brittle structure is unable to deform during an earthquake without collapsing. Brittle buildings include those made of brick or concrete block joined together with mortar but not reinforced with steel rebar. In an earthquake, your wood-frame house might survive, but your chimney, made of brick not reinforced with rebar, might collapse. Your house is ductile, but your chimney is not (Fig. 11-13).
The reinforcing techniques described below are for a house that has already been built; this is called a retrofit. These techniques are also applicable to new construction, in which case they are a lot less expensive. This is immediately apparent in shoring up the foundation. It’s the difference between working comfortably on a foundation before the house is built on top of it and working in a confined crawl space.
3. Protecting Your Foundation
If you have a poured-concrete foundation, hit it with a hammer to check on its quality. If the hammer makes a dull thud rather than a sharp ping, or there are throughgoing cracks more than one-eighth inch wide, or the concrete is crumbly, get professional help.
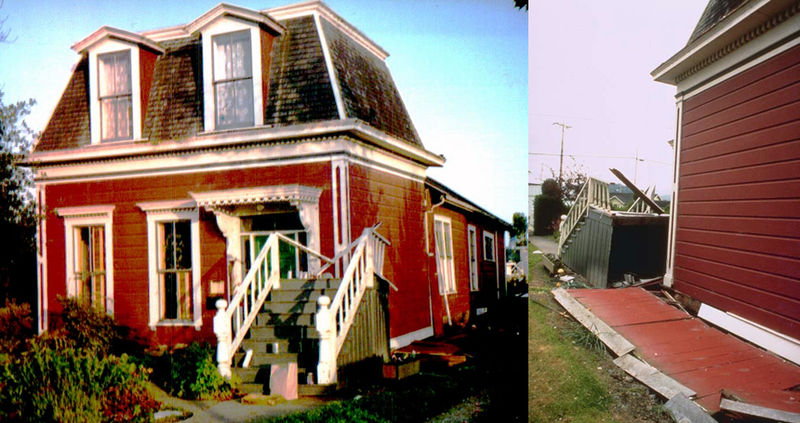
Let’s assume that the concrete is okay. The next job is to see if your house is bolted to the foundation and is adequately braced. Otherwise, horizontal inertial forces could slide the foundation out from under the house, which happened to wood-frame houses in northern California during earthquakes in October 1989 and April 1992 (Figure 11-4).
Some houses are built on a concrete slab, or floor. Others have a concrete foundation around the edge of the house. In these, a board called a mudsill is generally found between the house and its foundation. Older houses were not required to be bolted to the foundation through the mudsill. In 1973, the Uniform Building Code began to require that walls be anchored to foundations (Figures 11-1, 11-2, 11-3).

The standard retrofit technique is to drill a hole through the mudsill and into the foundation with a rotary hammer or a right-angle drill, which can be rented, although you should purchase your own drill bit. Next, using a sledge hammer, drive a sill bolt (oranchor bolt) into the hole you’ve just drilled, having first cleaned out the hole and made sure that it’s deep enough to accommodate the sill bolt. The sill bolt has a washer on top and an expanding metal sleeve at the base that slides up, spreads, and wedges in the concrete. Bolt sizes range from one-half by seven inches to three-quarters by ten inches; a standard size is five-eighths by eight-and-one-half inches. The larger ones give more protection against lateral loads and are preferred if the house has more than one story. If the nut on top of the bolt won’t tighten, or the bolt climbs out of the hole as you tighten it, the concrete might be decomposing. If so, you could set the bolt with epoxy cement, if allowed by local building codes.
In new construction, the sill bolt is set when the foundation is poured, a fairly simple operation.
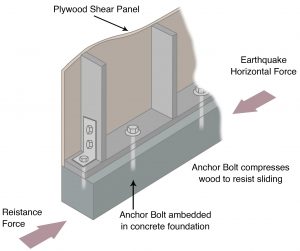
The spacing of bolts, in both new construction and in retrofits, is at least one every six feet, and one within twelve inches of the end of any mudsill (Figure 11-3). Placing the bolts midway between the studs (the vertical members that support the walls) makes it easier to work on them.
The next step is stiffening the cripple wall (pony wall), which is made of short studs and sits between the mudsill and the floor joists of the house itself (Figures 11-2, 11-3). The cripple wall bounds the crawl space under the house where you’re working. The problem here is that if these vertical studs are not braced, they can tilt over like a set of dominoes due to horizontal inertial forces, so that your house collapses on its crawl space and flops down on its foundation (Fig. 11-4).
Since 1973, the Uniform Building Code has required bracing of cripple walls; the bracing requirements were increased in 1991. If your home was built before those critical dates, you might need to brace the cripple wall yourself. The recommended stiffening technique is to use one-half-inch plywood; five-eighths-inch if you use a nail gun (Figures 11-2, 11-3). Treat the plywood with a preservative prior to installation to prevent rot. Ideally, you should sheathe the entire cripple wall in plywood, but at a minimum, install eight linear feet of plywood from each interior corner of the crawl space for one-story houses; sixteen feet for two-story houses. Anchor the plywood panels with eight-penny nails four inches apart around the edges of each panel and six inches apart on each interior stud. (The nailing pattern is important; one of the most memorable sounds of a house breaking up during an earthquake is the wrenching noise of nails being pulled from the walls.) Drill vent holes one inch in diameter to prevent moisture buildup.
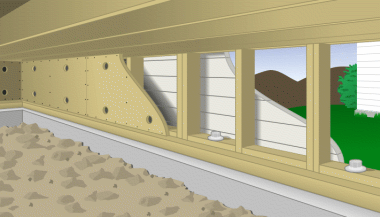
Plywood sheeting should be at least twice as long as it is tall (Figure 11-3). If it isn’t, the sheeting should be reinforced with anchors and hold-downs (Figure 11-2). These anchors bolt into the foundation and into corner posts of the cripple walls, increasing the bracing. Another solution, particularly if the cripple wall is very short or if the floor joists of the house rest directly on the foundation, is quarter-inch structural steel bolted with expansion bolts into the foundation and into the floor joists.
A do-it-yourselfer will spend at least $600 for the materials. However, working in crawl spaces is messy and confined, and you might wish to employ a professional. This will cost you several times as much as doing the job yourself; a contractor might charge as much as twenty-five dollars per installed bolt. But reinforcing the cripple wall and bolting to the foundation are the most important steps you can take to save your house. Cripple-wall failures are shown in Figures 11-4 and 11-5.

As insurance companies in the Pacific Northwest begin to base earthquake-insurance premiums to the details of construction of your house, as they now do in California, reinforcement will almost certainly reduce your premium. You are likely to be denied earthquake insurance if your house is not bolted to its foundation.
4. Soft-story Buildings
A common failure in California’s recent earthquakes was the two- or three-car garage with living space overhead. Many condominiums have most of the ground floor devoted to parking, with apartments in the upper floors. The large open space at the garage door means less bracing against horizontal forces than in standard walls, so these open areas are the first to fail in an earthquake (Figure 11-6). A wood-frame apartment building is lighter and fares better than a massive concrete structure like a hospital. Similar problems arise on a smaller scale with large picture windows, sliding-glass patio doors, or double doors.
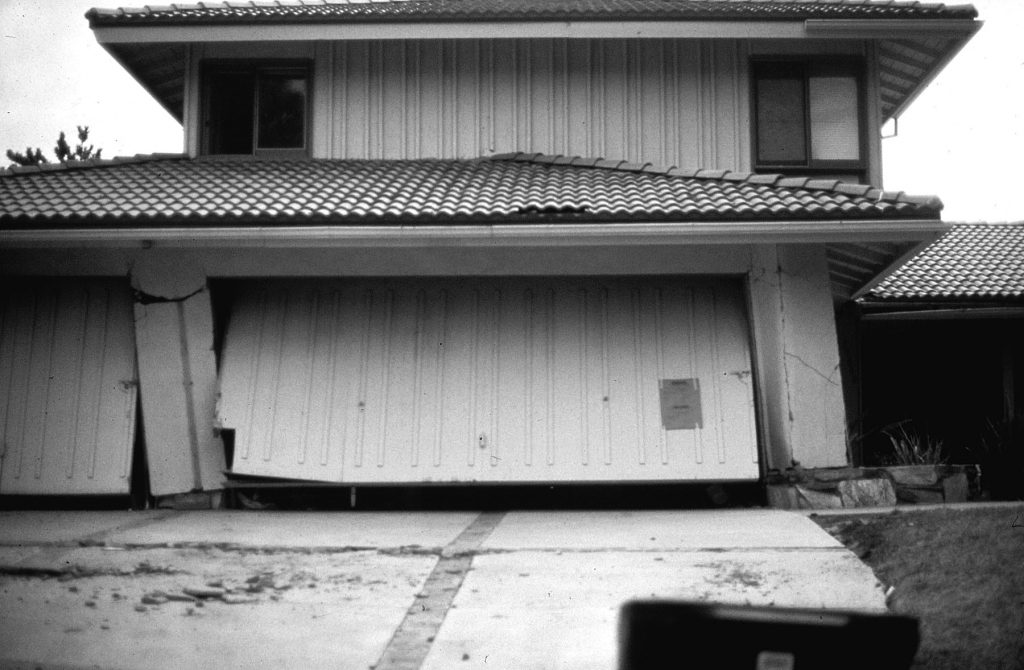
Make sure that the wall around the garage door and the wall in the back of the garage, on the opposite side from the door, are sheathed with half-inch plywood, just as cripple walls are. Because of the limitations for bracing on the garage door itself, bracing the back wall, opposite from the door, will increase the overall resistance of the structure to earthquake ground motion sideways to the door.
Plywood sheathing should completely surround any large picture window or set of double doors. The sheathing should be at least as wide as the opening and extend from bottom to top of the opening. The interior wall is finished in drywall or plaster, so the best time to add sheathing is during initial construction or major remodeling.
5. Utility Lines
One of the greatest dangers in an earthquake is fire. Fire caused much of the loss of life and property in the 1906 San Francisco Earthquake and the 1995 Kobe Earthquake, and large fires destroyed property in the Marina District of San Francisco after the 1989 Loma Prieta Earthquake. The problem is natural gas.
If gas connections are rigid, they are likely to shear during an earthquake, releasing gas that needs only a spark to start a fire. Gas connections should be flexible. After an earthquake, you must shut off the main gas supply to the house (Figure 11-7). Learn where the gas supply line is and ensure that the shut-off valve is not stuck in place by turning it one-eighth turn (one-quarter turn is the closed position). Your gas company will sell (or give) you an inexpensive wrench (illustrated in Figure 11-7) that should be kept permanently near the valve. Tell all members of the family where the wrench is and how to use it. In the event of a major earthquake, shutting off the gas is a top priority. You won’t have time to rummage around a heavily damaged house looking for a wrench.
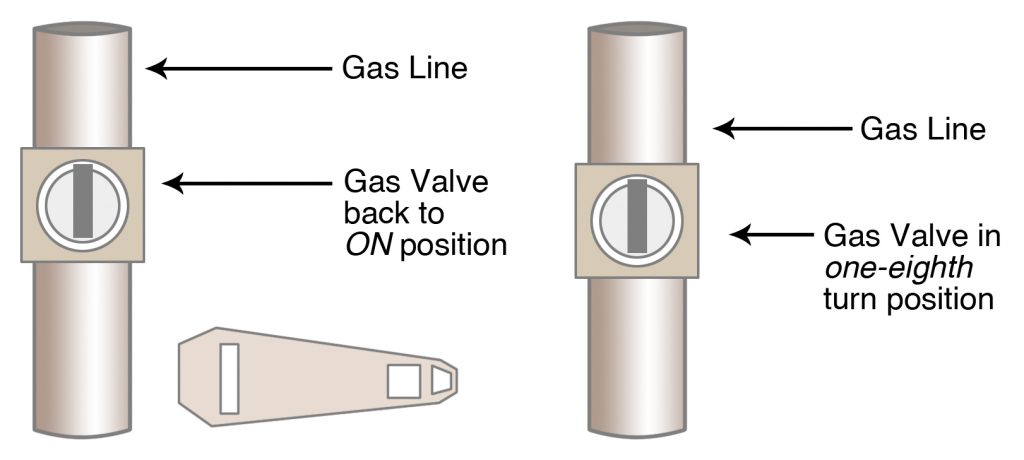
For $400 to $600, you can have an automatic shutoff valve installed on the gas line. This valve, located between the gas meter and the house, is activated by earthquake shaking, which knocks a ball or cylinder off a perch inside the valve into a seat, thereby shutting off the gas. Consider an automatic shutoff valve if you are away from home a lot and are not likely to be around to shut off your gas after an earthquake. A disadvantage of the automatic shutoff valve is that you wouldn’t be able to tell easily if you had a gas leak in your house after the valve had shut off the gas. If you’re confident that you don’t have a gas leak, you should know how to reset the valve yourself, because after a major earthquake, weeks might go by before the gas company or a plumber could get to your house and reset the valve for you. Remember that when the valve is reset, you must immediately relight all the pilot lights in your appliances.
All gas lines and water pipes should be supported at least every four feet. Earthquake vibrations can be strongly exaggerated in unsupported pipe in your basement or crawl space. If pipes are not supported, strap them to floor joists or to walls.
If liquefaction occurs, underground utility lines might be severed, even if your house is anchored below the liquefying layer and doesn’t fail. Underground gas lines failed due to liquefaction in the Marina District of San Francisco, triggering many fires.
A generator can supply emergency power, but this should be installed by a licensed contractor. The generator should be installed in a well-ventilated place outside the home or garage, and fuel should be stored according to fire regulations. A generator installed in a closed place in the house could lead to carbon monoxide poisoning.
6. Strapping the Water Heater and Other Heavy Appliances and Furniture
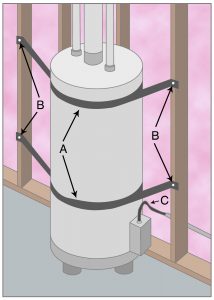
Your water heater is the most unstable appliance in the house. It’s heavy, being full of hot water, and it’s tall, likely to topple over due to horizontal forces from an earthquake.
Strap the water heater in place, top and bottom, with heavy-gauge metal straps (not plumber’s tape, which is too brittle to be effective). Anchor the straps to studs in the wall at both ends (Figure 11-8). Make a complete loop around the water heater (one and a half times) before anchoring it to the studs. This precaution is very easy and inexpensive to do and will not reduce the effectiveness of the water heater at all. Commercial kits are available from Walmart, Lowe’s, Home Depot; contact Seattle’s SDART Program for further information. One company is Hubbard Enterprises at www.holdrite.com, phone 800-321-0316.
If the water heater is right against the wall, brace it against the wall with two-by-fours so that it doesn’t bang against the wall during an earthquake. If it’s against a concrete wall, install quarter-inch expansion bolts directly into the concrete on both sides of the water heater and run steel cable through the eye screws, again making a complete loop around the heater.
If you have a water cooler, with a large heavy water bottle on top, strap this, too. You will need the water if your water supply is shut off during an earthquake.
Built-in dishwashers, stoves, and ovens might not be braced in place; they may only rest on a trim strip. One homeowner was quoted in Sunset Magazine after the October 1989 Loma Prieta Earthquake: “I assumed built-in appliances are fixed in place. NOT SO! Our built-in oven and overhead built-in microwave slid out.” Make sure your appliances are securely braced (Figure 11-9). A gas stove might topple over, snapping the gas line and causing a fire. Secure the refrigerator to the wall. Babyproof refrigerator door locks are effective in preventing food in the refrigerator from spilling out on the floor.

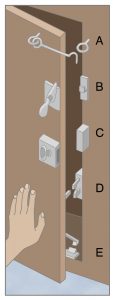
Look around your house for tall, top-heavy furniture such as a china cabinet, tall chest of drawers, bookcase, or wardrobe. Attach these to studs in the wall to keep them from falling over (Figure 11-10). There are two concerns. One is the loss of heirloom china in your china cabinet. The other is the possibility of a heavy piece of furniture falling on you or on a small child. For either of these reasons alone, securing these large pieces of furniture to the wall is a good idea. Home computers and flat-screen televisions should be secured in the same way.
7. Safety Glass
A major problem in an earthquake is shattered glass windows, which might flex and essentially blow out, showering those within range with sharp glass fragments. An expensive option is to replace glass in large picture windows or sliding doors with tempered or laminated glass. A much cheaper alternative is safety film, which costs about three to four dollars per square foot, installed. This bonds the glass to a four-mil thick acrylic sheet; the adhesive strengthens the glass and holds it together if it breaks, like the safety glass in a car windshield. You can do this yourself, but it’s difficult to prevent air bubbles from being trapped under the film, so consider having it installed professionally.
8. Cabinets
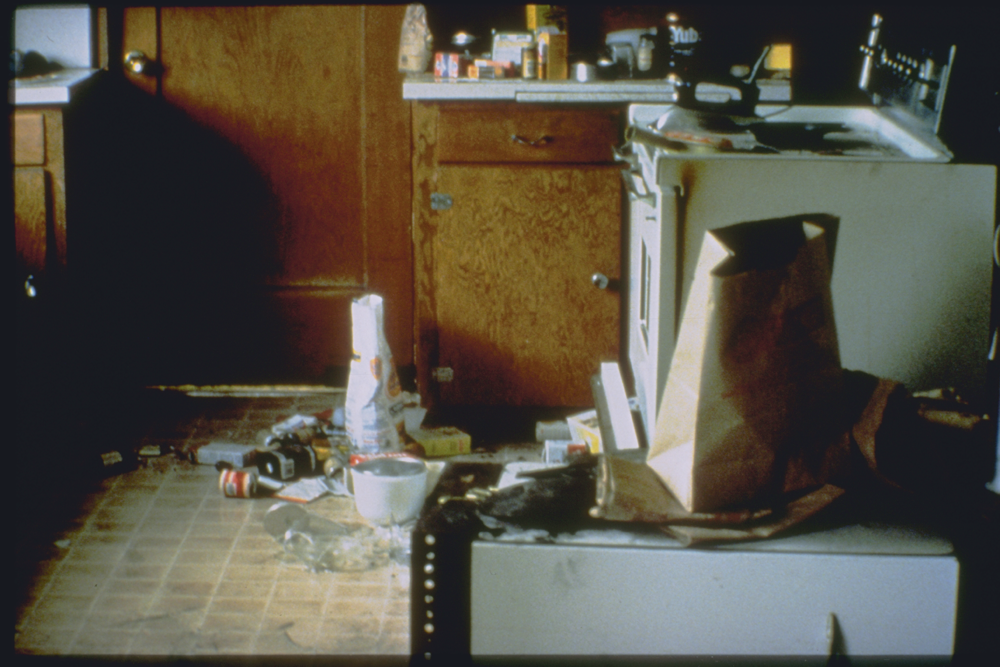
Remember José Nuñez of Molalla, Oregon, who watched his kitchen cabinets blow open during the 1993 Scotts Mills Earthquake, spewing their contents onto the kitchen floor? Magnetic catches often fail. However, inexpensive babyproof catches will keep cabinet doors closed during an earthquake (Figure 11-11). Heavy, spring-loaded latches are advised, especially for cabinets containing valuable dishes.
If small children live in your house, you might already have babyproof catches, but they’re probably only on cabinets near the floor, within a child’s reach. For earthquake protection, the most important places for babyproof catches are the highest cabinets, particularly those containing heavy, breakable dishes or fragile glassware. Don’t forget the medicine cabinet in the bathroom, where prescription medicine could fall on the floor and mix, producing a toxic combination.
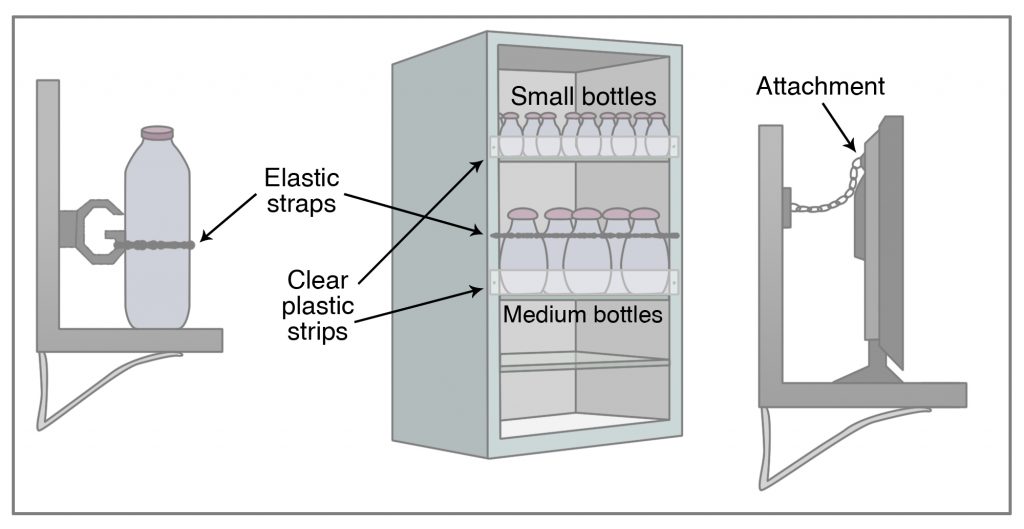
Put layers of foam or paper between heirloom plates that are seldom used but are at great risk during an earthquake. Line your shelves with nonskid shelf padding, available at marine- and recreational-vehicle supply houses, because they are also useful to keep items on the shelf during a heavy sea or when your recreational vehicle is traveling down a bumpy road. In a similar vein, consider a rail or plastic strip around open shelves to keep items from falling off (Figure 11-12). Hold-fast putties are small balls that flatten and stick to the bottom of a large vase to keep it from toppling over; these putties will peel off and leave no residue. Lead weights in old socks can be placed in the bottom of vases or table lamps to keep them in place.
You won’t be able to take all these precautions. But, considering that a third of your life is spent in bed, lie down on your bed and look around for items that could fall on you during an earthquake. A heavy chest of drawers? A bookcase (Figure 11-10)? A large wall mirror? A ceiling fan? A large headboard? Secure those items that might endanger your life. Then do the same for the beds where other members of your family sleep, particularly small children. (Maybe it’s simpler to move the bed than to secure the furniture!)
Renters might be restricted by the landlord from fastening furniture to the wall. A discussion with the landlord might help, particularly if you are willing to patch the holes in the wall when you move.
9. Bricks, Stonework, and Other Time Bombs
If you live in an old, unreinforced brick house, you are in real danger, and none of the retrofit techniques mentioned above will do much good outside of a major costly reinforcing job. Fortunately, old brick houses in the Pacific Northwest are being phased out of the building inventory; most of us live in wood-frame houses.
But one part of your house is still likely to be unreinforced—your masonry chimney (Figure 11-13). Chimneys collapse by the hundreds during major California earthquakes. Many chimneys were damaged during the Nisqually Earthquake, and one collapsing chimney seriously injured Curtis Johnny inside his apartment. Most commonly, chimneys snap at the roof line. A tall chimney is likely to be set in motion by earthquake waves, resulting in collapse. The taller the chimney, the more likely it is to fall through the roof into your house. Some recent building codes require internal and external bracing of chimneys to make them more likely to survive an earthquake.

Even if your chimney didn’t fall during the earthquake, it might have been damaged, partially or completely blocking the flue. If this happens, gases produced by your furnace, including carbon monoxide, may enter your house, possibly enough to kill you. How do you know you have a problem unless you have a carbon monoxide detector? Your family might become ill in the house. Another clue is water-vapor condensation on your windows, a product of burning natural gas that is not vented properly. Have your chimney checked by a professional, even if it looks okay after the earthquake. Install a detector.
A good rule of thumb is to consider how much of a threat your chimney poses. If someone could be killed or severely injured by a falling chimney, take it down. Prefabricated metal chimneys can be attached to an existing brick firebox so that no brick projects above the roof line.
Inside the house, there’s the mantel. The mantel may be field stone—very attractive, but very heavy if it fails, particularly if the mortar has been weakened by a chimney leak. Field stone and brick veneer on the outside of the house may pose a hazard as well. If you want a natural stone appearance, install the lightest-weight material you can.
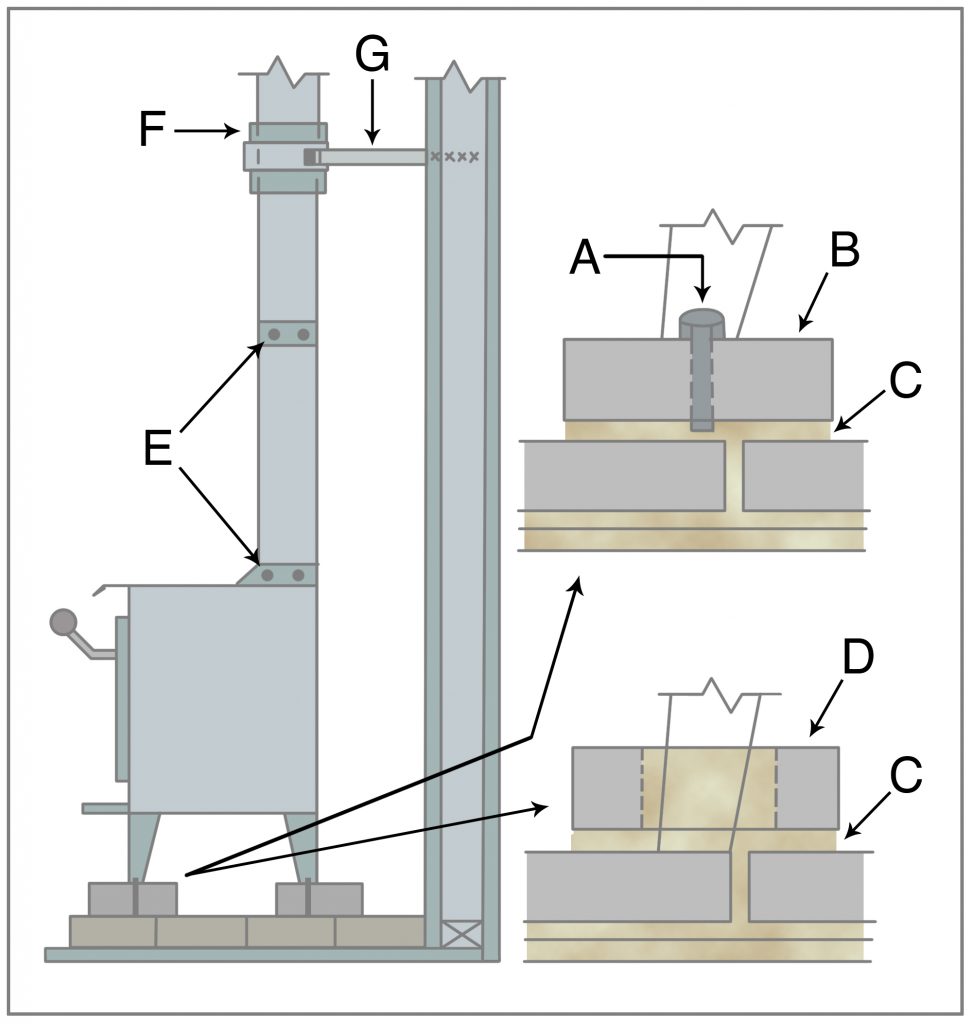
Freestanding wood-burning stoves are popular in the Pacific Northwest. A study done by Humboldt State University found that more than half the wood-burning stoves in the area near the epicenter of the April 1992 M 7.1 Cape Mendocino Earthquake moved during the earthquake, and several fell over. Fire codes in some states leave stoves unsupported on all four sides, which might cause them to slide or turn over during an earthquake. If a stove tips over and separates from its stovepipe, cinders or sparks can cause a fire.
The following steps are recommended (Figure 11-14). (1) Anchor a stove resting on a brick hearth, attaching the stove legs to the hearth with bolts. Mobile-home-approved stoves have predrilled holes in the legs for anchoring to the floor framing. (2) Anchor a stove resting on a concrete slab directly to the concrete. (3) Anchor the stovepipe to the flue, and tie together each of the stovepipe segments.
In the Kobe Earthquake, thousands of people were killed in their beds in wood-frame houses because their roofs were of tile, which made the houses top-heavy and more subject to collapse. Clay tile roofs are the heaviest; composition or wood roofs are lighter. If you reroof your house, add plywood shear panels over the rafters. This is often required in new construction and might be required if you remodel. It strengthens the house.
10. Propane Tanks
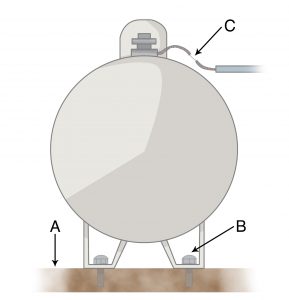
Above-ground propane tanks can slide, bounce, or topple during an earthquake, causing a fire hazard from a gas leak. You can reduce the fire danger by doing the following (Figure 11-15): (1) Mount the tank on a concrete pad and bolt the four legs of the tank to the pad. (2) Install flexible hose connections between the tank, the supply line, and the entrance to your house. (3) Clear the area around the tank of objects that could fall and rupture the tank or its gas supply line. (4) Tie a wrench near the shut-off valve, and make sure all family members know where it is and how to use it. For large tanks, such as those used commercially or on a farm, install a seismic shut-off valve.
11. Connections
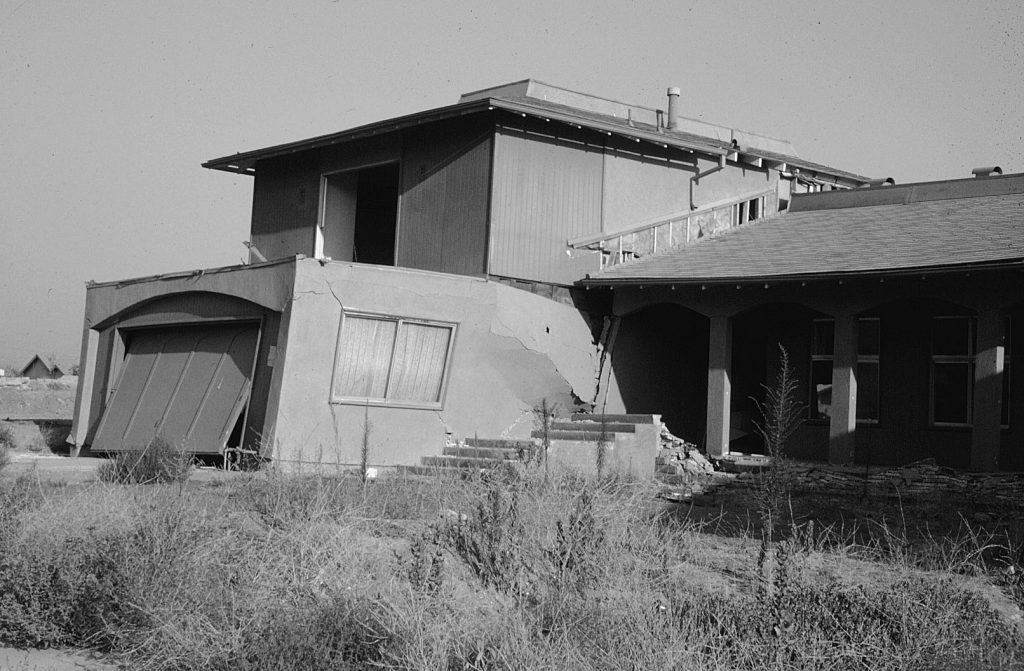
One of my most instructive memories of the 1971 Sylmar Earthquake was a split-level house, where earthquake shaking accentuated the split between the garage with a bedroom over it and the rest of the house (Figure 11-16). A common sight is a porch that has been torn away (Figure 11-5), or a fallen deck or balcony. These connections are the potential weak link in the chain that is your home. Make sure that everything is well connected to everything else so that your house behaves as a unit during shaking.
12. Mobile Homes and Manufactured Houses
Because these houses must be transported to their destination, they are more likely than an ordinary house to behave as a coherent structural unit during an earthquake. Manufactured houses are built on one or more steel I-beams that provide structural support in the direction of the I-beam. However, mobile homes and manufactured houses are commonly not bolted to a foundation, but instead rest on concrete blocks that are likely to collapse during even low horizontal accelerations (Figures 11-17, 11-18). This would cause the house to flop down onto its foundation, as illustrated earlier for cripple-wall failures. A mobile home is likely to undergo less structural damage than an ordinary house, but is more likely to suffer extensive damage to the contentsX of the house. The house could be prevented from sliding off its blocks during an earthquake by replacing the blocks with a cripple wall and securing it as described above for ordinary houses. This would make the house insurable against earthquakes.
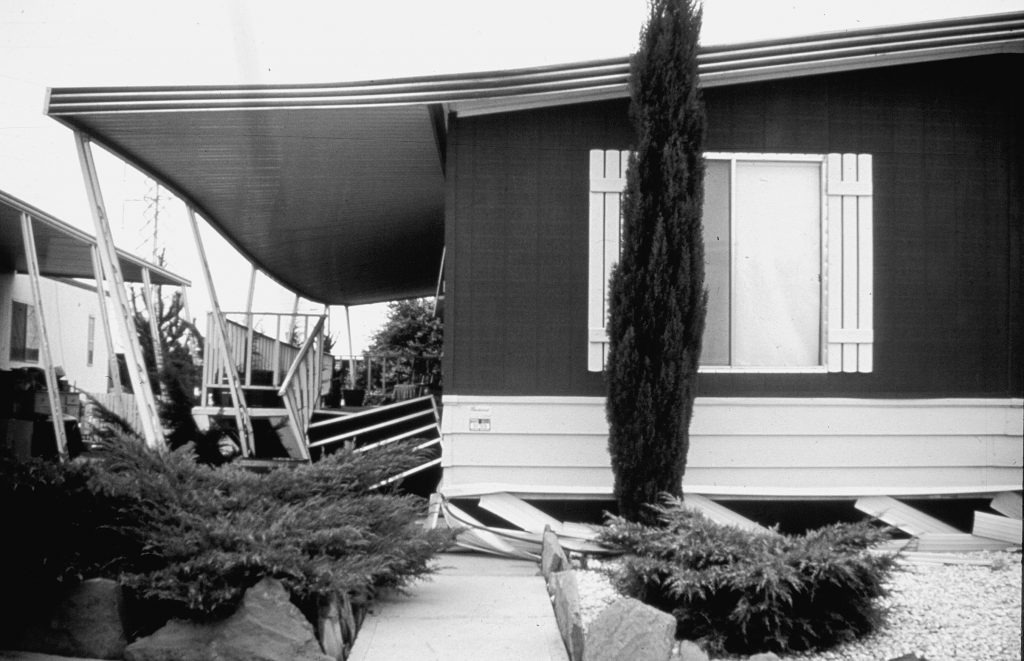
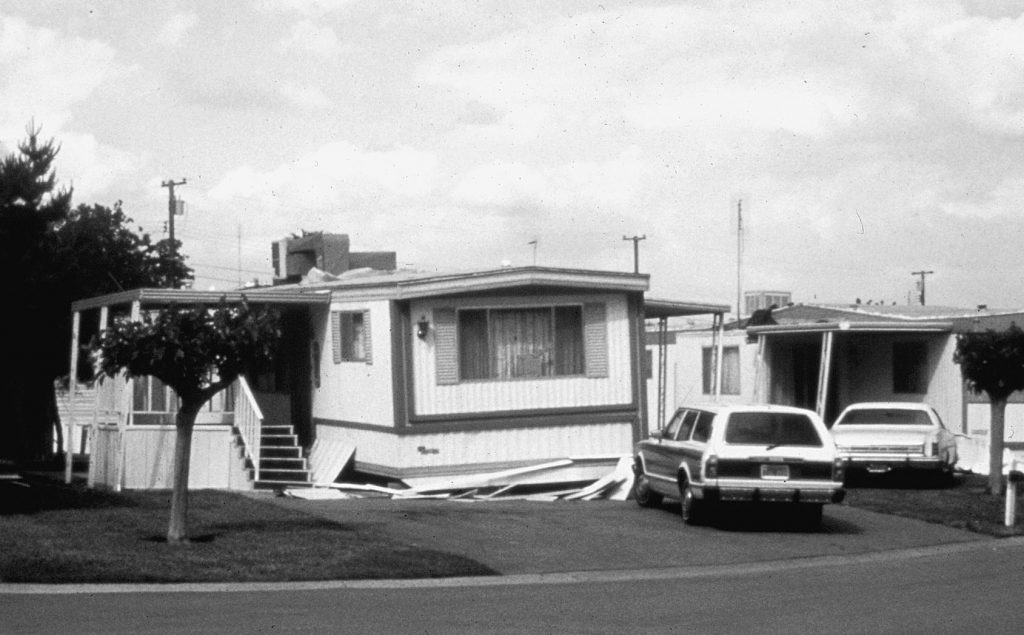
A double-wide mobile home must be well connected at the join between the two halves (marriage line) so that the two halves do not fail at the join and move independently during strong shaking. Ridge beams should be attached with half-inch carriage bolts spaced at a maximum of forty-eight inches at ninety degrees and three-eighths-inch lag screws, with washers, spaced every twenty-four inches at forty-five degrees maximum angle. Floor connections must use three-eighths-inch lag screws with washers installed diagonally at forty-five degrees or less, with spacing not exceeding thirty-two inches. Even so, it’s likely that a double-wide manufactured home will fail at the marriage line if it slips off its concrete block foundation during an earthquake.
13. Okay, So What Retrofitting Are You Really Going to Do?
You probably won’t take all of these steps in making your home safer against earthquakes. Doing everything would be costly and might not increase the value of your home, unless it successfully rides out an earthquake. So you might decide to live with some risk.
At least do the following: (1) bolt your house to its foundation, (2) strengthen your cripple wall, (3) install flexible connections on all your gas appliances and make sure the main shut-off valve can be turned off quickly in an emergency, (4) secure your water heater, and (5) make sure that large pieces of furniture or large ceiling fixtures won’t collapse on anyone in bed. This protects you against a catastrophic collapse of your house, and against fire or serious injury.
Home retrofit kits are available through the Federal Emergency Management Agency, the City of Seattle, and the California Office of Emergency Services. With the increasing knowledge about earthquake hazards in the Northwest, some builders now offer their expertise in seismic retrofits. Kits to strap the water heater, fasten cabinets, and anchor heavy furniture are available commercially.
Suggestions for Further Reading
California Office of Emergency Services. An Ounce of Prevention: Strengthening Your Wood Frame House for Earthquake Safety. Video and how-to booklet.
Humboldt Earthquake Information Center. How to survive earthquakes and tsunamis on the north coast. Arcata, CA, Humboldt Earthquake Information Center, Humboldt State University, 23 p.
Lafferty and Associates, Inc. 1989. Earthquake preparedness—for office, home, family and community. P.O. Box 1026, La Canada, CA 91012.
Project Impact. 2002. Home earthquake retrofit series, 3 volumes, available from Federal Emergency Management Agency and City of Seattle.
Seismic Safety Commission (California). 1992. The homeowner’s guide to earthquake safety. 28p.
Sunset Magazine. 1990. Quake—2-part series in October and November 1990 issues, available as reprints (Sunset Quake ’90 Reprints) from Sunset Publishing Company, 80 Willow Road, Menlo Park, CA 94025.

